How to Check Coolant Levels Safely – Essential Car Care Guide
Introduction
Knowing how to check coolant levels is one of the simplest yet most crucial aspects of car maintenance. Your vehicle’s coolant, also known as antifreeze, plays a vital role in regulating engine temperature, preventing overheating in the summer and freezing in the winter. Without proper coolant levels, your engine can suffer costly damage or even complete failure. Unfortunately, many drivers overlook this quick check until it’s too late, leading to breakdowns that could have been easily avoided.
The process of how to check coolant levels doesn’t require advanced mechanical skills or expensive tools. In fact, with just a few minutes of your time and some basic safety awareness, you can protect your engine and extend your car’s lifespan. Whether you drive daily in hot conditions or through freezing winters, keeping an eye on your coolant ensures the engine runs smoothly and efficiently.
In this comprehensive guide, we’ll explain step-by-step how to check coolant levels, what tools you may need, and the warning signs that indicate your system is running low. You’ll also learn about common mistakes to avoid and the importance of safety precautions when opening your car’s hood. By the end of this article, you’ll feel confident and ready to check your coolant regularly as part of your car’s preventive maintenance routine.
If you’ve ever wondered how to check coolant levels without risking burns or damaging your vehicle, this article is for you. Let’s dive in and make sure your car is always ready for the road ahead.
Why Checking Coolant Levels Matters
Understanding how to check coolant levels goes beyond just keeping your car topped up with fluid—it’s about safeguarding the entire cooling system and, ultimately, your engine. Coolant is not just dyed water; it is a carefully formulated mixture of antifreeze and water that regulates temperature, prevents corrosion, and protects delicate internal parts. When levels drop too low, your engine cannot properly manage heat, and that can lead to overheating, warped parts, or catastrophic failure. This is why every driver should learn not just when, but also how to check coolant levels the right way.
A car’s engine operates under extreme conditions, producing intense heat as fuel combusts. Without coolant, metal components can expand, seize, or crack. Conversely, in freezing climates, insufficient antifreeze may allow liquid to solidify, causing the radiator or hoses to burst. By learning how to check coolant levels, you can identify potential problems early and avoid costly repair bills. Even if your vehicle is relatively new, checking coolant should be part of your routine maintenance schedule.
Another reason why monitoring coolant matters is safety. Low coolant can trigger warning lights on your dashboard, but sometimes these indicators appear too late. If you know how to check coolant levels manually, you gain peace of mind before long trips, during seasonal temperature shifts, or after noticing unusual engine sounds. Preventive checks are especially important for those who drive in mountainous terrain or tow heavy loads, since engines in such conditions are under greater stress and generate more heat.
Environmental responsibility is also linked to proper coolant care. Modern coolants contain additives that can be harmful if leaked. Learning how to check coolant levels helps you spot leaks early, reducing the risk of coolant spilling into the environment and contaminating soil or waterways. In addition, topping up regularly keeps the cooling system balanced, minimizing the chance of chemical breakdown and extending the life of both coolant and engine components.
For DIY car owners, the knowledge of how to check coolant levels also builds confidence. You won’t feel reliant on a mechanic for every minor check, and you’ll understand your car’s warning signs better. Many car problems start small, but if neglected, they escalate quickly. Something as basic as noticing your coolant reservoir dropping consistently could alert you to a slow leak, giving you time to schedule a repair before the issue worsens.
In summary, knowing how to check coolant levels is more than a routine task—it is a proactive step toward engine longevity, driving safety, and environmental responsibility. Skipping this habit may save you a minute today, but it could cost you hundreds or even thousands tomorrow. This is why experts emphasize the importance of checking coolant as often as you check tire pressure or oil. It’s a small habit with big benefits.
Tools You Need Before Checking
Before you start learning how to check coolant levels, it’s important to gather the right tools and materials. Having everything prepared not only saves time but also ensures you can perform the check safely and correctly. Fortunately, the required tools are simple and affordable, making this task accessible to anyone—even those with little mechanical experience.
The first item you’ll need is a clean pair of gloves. Since coolant is a chemical mixture that can irritate the skin, gloves provide a barrier of protection. In addition, wearing safety glasses is a smart precaution, as small splashes or steam could harm your eyes if you open the system at the wrong time. Safety gear may seem unnecessary for such a simple task, but it is a key part of knowing how to check coolant levels responsibly.
Next, you will need a flashlight. Many coolant reservoirs are located in tight or shaded areas under the hood. A small flashlight helps you see the level indicators clearly, ensuring that your reading is accurate. Some reservoirs are transparent with “MIN” and “MAX” markings, while others may require you to peer carefully inside. Using a light source eliminates guesswork and gives you confidence when determining whether your coolant level is safe.
A clean rag or paper towels are also essential tools when learning how to check coolant levels. You’ll use the rag to wipe away dirt or grease from the reservoir cap, preventing debris from entering the system. Additionally, a rag can help you open the cap safely, especially if it feels stuck. Always remember never to open the radiator cap when the engine is hot—wait until it cools completely to avoid dangerous pressure release.
Depending on your findings, you may also need premixed coolant or antifreeze. Having a small container on hand allows you to top up immediately if you notice the levels are below the minimum mark. It’s important to use the correct type of coolant recommended in your car’s manual, since mixing the wrong fluids can cause chemical reactions and damage your engine. Keeping a bottle of the right coolant in your trunk ensures you’re always prepared, whether you’re at home or on the road.
Finally, if you’re documenting your car maintenance or if multiple people drive the vehicle, a maintenance logbook or a smartphone app can be helpful. Recording the dates and results each time you check coolant makes it easier to spot patterns, such as gradual loss over time. This simple record-keeping complements your knowledge of how to check coolant levels and helps detect leaks or inefficiencies in the cooling system sooner.
To sum up, the basic tools you need include gloves, safety glasses, a flashlight, a clean rag, and the correct coolant fluid. With these items ready, you’ll be able to practice how to check coolant levels with confidence, efficiency, and safety. These simple preparations transform a routine task into a reliable maintenance habit that can save you from major engine trouble down the road.
Step-by-Step Guide on How to Check Coolant Levels
Now that you understand the importance of coolant and have gathered the right tools, it’s time to walk through the exact process. This guide will break down how to check coolant levels into three clear steps. Each step focuses on safety, accuracy, and good maintenance practices so that even beginners can follow along with confidence.
Step 1: Prepare Your Vehicle and Ensure Safety
The first step in learning how to check coolant levels is making sure your vehicle is safe to approach. Park your car on a flat, stable surface and turn off the engine. Allow the vehicle to cool down completely before opening the hood. This is critical because coolant operates under pressure when the engine is hot, and opening the system too soon can cause hot fluid or steam to escape, leading to serious burns.
While you wait for the engine to cool, put on your gloves and safety glasses. Gather your flashlight and rag so they’re within easy reach. Double-check that the parking brake is engaged to prevent any accidental rolling while you’re working under the hood. This preparation phase may seem simple, but it is an essential part of how to check coolant levels correctly. Rushing or skipping safety steps is one of the most common mistakes made by inexperienced car owners.
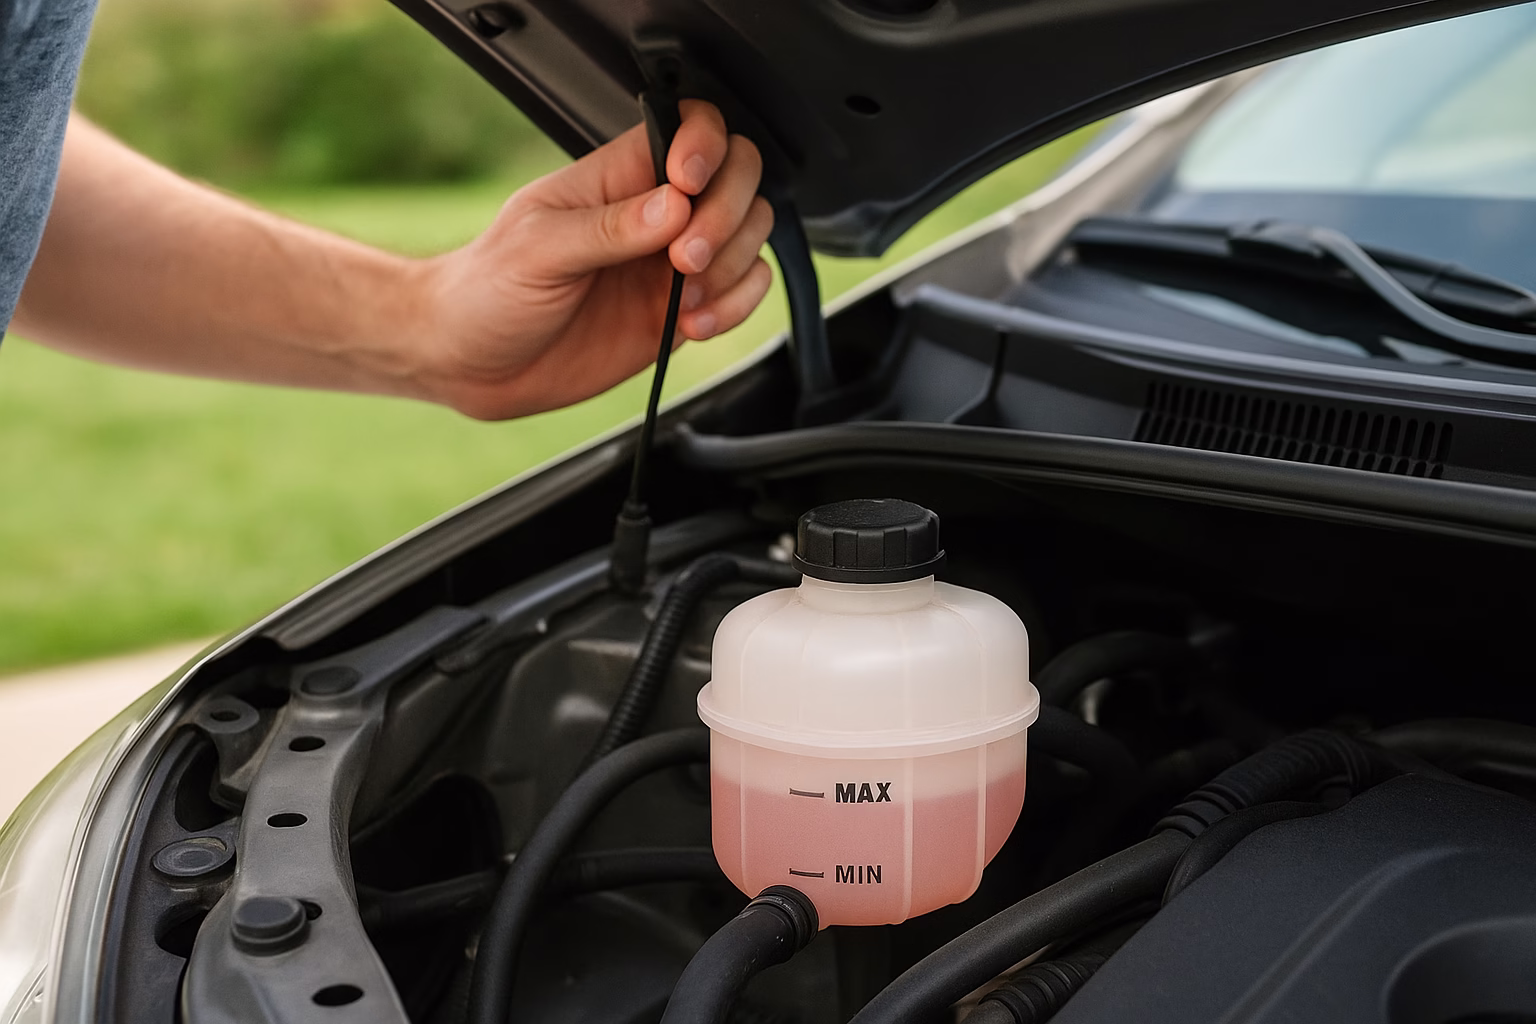
Once the engine is cool, pop the hood and secure it with the prop rod or hydraulic supports. Take a moment to familiarize yourself with the layout of the engine bay. Most modern vehicles have a translucent plastic reservoir tank located near the radiator. It’s usually marked with “MIN” and “MAX” indicators, making it easier to check at a glance. If you don’t see a clear reservoir, refer to your car’s manual for guidance. This initial setup is the foundation for the rest of the process.

Step 2: Locate and Inspect the Coolant Reservoir
The second step in how to check coolant levels involves finding the coolant reservoir and evaluating the fluid level inside. Shine your flashlight on the reservoir to identify the current fluid position relative to the “MIN” and “MAX” markings. If the level is within this range, your coolant is sufficient. If it’s close to or below the minimum line, it’s time to add more coolant.
Look closely at the coolant’s color and clarity. Healthy coolant is typically green, orange, or pink, depending on the type used by your manufacturer. If the fluid appears rusty, brown, or has floating particles, it may be contaminated and require a full system flush. While checking, also inspect the outside of the reservoir for cracks or leaks. Even a small leak can gradually deplete coolant levels, making it important to catch early.
If your reservoir doesn’t provide a clear reading, you may need to carefully open the radiator cap to inspect directly. Remember to do this only when the engine is fully cool. Place your rag over the cap, twist slowly, and release any built-up pressure cautiously. Never attempt this on a hot engine. This cautious approach is a core part of how to check coolant levels safely and avoids one of the most dangerous mistakes drivers make.
Step 3: Top Up and Secure the System
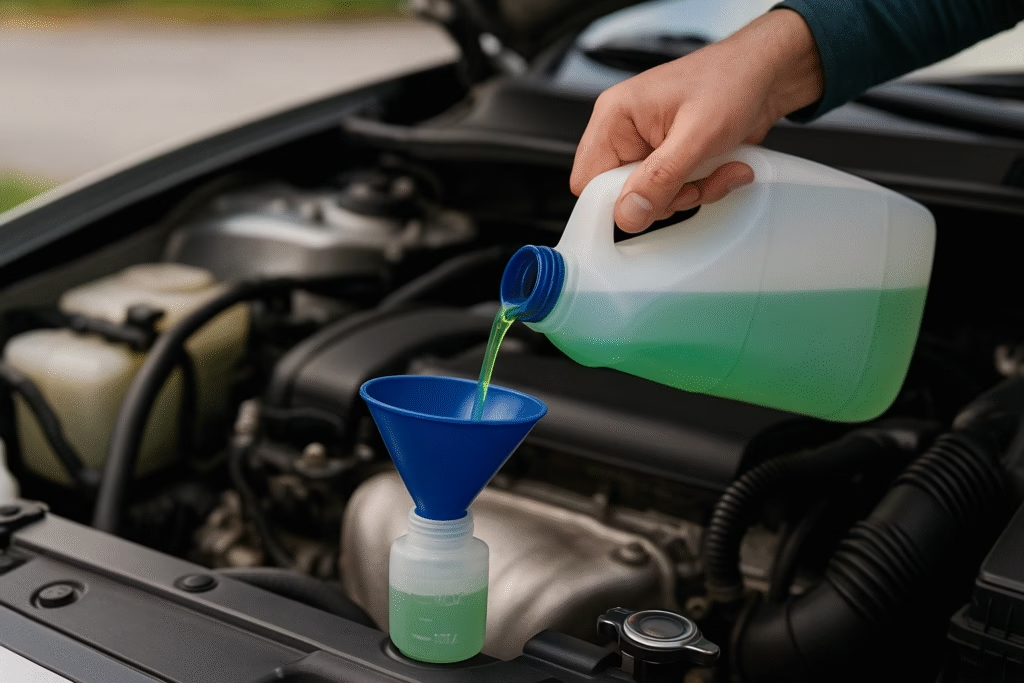
The final step in how to check coolant levels is topping up if necessary. Using the correct premixed coolant (or a proper antifreeze-to-water ratio if mixing yourself), slowly pour fluid into the reservoir until the level sits between the “MIN” and “MAX” lines. Avoid overfilling, as excess coolant may expand and cause overflow when the engine heats up.
After filling, securely tighten the reservoir or radiator cap. Make sure the cap is properly sealed, since loose caps can allow coolant to escape and reduce pressure in the cooling system. Once sealed, wipe away any spilled fluid with your rag. This step also gives you a chance to recheck for leaks or drips around the reservoir area.
When you finish, close the hood and start the engine. Let it idle for a few minutes, keeping an eye on the temperature gauge to ensure the engine warms up normally without overheating. This final check confirms that your coolant level adjustment is effective. Congratulations—you’ve completed the process of how to check coolant levels correctly and safely.
Common Mistakes to Avoid
While learning how to check coolant levels is straightforward, many drivers make small but critical errors that can lead to injury, inaccurate readings, or long-term engine damage. By understanding these common mistakes, you’ll be able to approach the process with more confidence and avoid unnecessary risks.
One of the most dangerous mistakes is checking coolant when the engine is still hot. Coolant is pressurized during operation, and opening the cap too soon can cause scalding liquid or steam to spray out. This can result in severe burns. Always wait until the engine is fully cooled before beginning. This precaution may feel inconvenient, but it’s a non-negotiable part of how to check coolant levels safely.
Another mistake is ignoring the type of coolant your car requires. Different vehicles use different formulas, and mixing incompatible coolants can cause chemical reactions, sludge buildup, and even corrosion within the engine. Always consult your owner’s manual to confirm the right type before topping up. Understanding this nuance is essential in mastering how to check coolant levels properly.
Overfilling the reservoir is also a common error. Many drivers assume that more coolant is better, but adding too much can cause overflow once the fluid expands with heat. Excess coolant can spill into the engine bay, creating mess and potential damage to surrounding parts. Staying within the “MIN” and “MAX” lines is key to correct maintenance.
Some people also make the mistake of checking only the reservoir level without inspecting the fluid quality. Even if the level is correct, coolant that looks rusty, oily, or contaminated is a warning sign of deeper issues, such as a failing head gasket or internal leak. Learning how to check coolant levels should always include assessing the appearance and smell of the fluid as well as the measurement.
Relying solely on dashboard warning lights is another error to avoid. While modern vehicles have sensors to monitor coolant levels and temperatures, these systems are not foolproof. A sensor may fail or provide delayed warnings, putting your engine at risk. By knowing how to check coolant levels manually, you gain an extra layer of protection and peace of mind.
Neglecting to resecure the cap tightly after inspection is another oversight. A loose or cross-threaded cap can allow coolant to escape and compromise system pressure, leading to overheating. Always double-check that the cap is firmly closed after completing the process.
Finally, failing to keep track of changes over time is a missed opportunity. If you consistently need to add coolant, it’s a sign of a leak or deeper mechanical issue. Ignoring such patterns can lead to expensive repairs down the road. Recording your checks in a logbook or app helps spot problems early and aligns with best practices in how to check coolant levels.
FAQ – How to Check Coolant Levels
Even after learning how to check coolant levels, many car owners still have questions about the process, timing, and safety. Below are some of the most frequently asked questions that drivers have when it comes to managing their vehicle’s coolant. These answers will help clear up confusion and give you extra confidence when performing this simple but essential maintenance task.
How often should I check my coolant levels?
Most experts recommend checking your coolant at least once a month or before long trips. However, the exact frequency depends on your driving conditions and the age of your vehicle. Older cars or vehicles driven in extreme climates may require more frequent checks. Incorporating how to check coolant levels into your monthly car maintenance routine is a proactive way to catch issues early.
Can I use water instead of coolant?
While water can temporarily help in emergencies, it is not a safe long-term replacement. Coolant contains antifreeze and corrosion inhibitors that water alone does not provide. Using only water can lead to rust, freezing in cold climates, or overheating in hot conditions. When practicing how to check coolant levels, always ensure that you top up with the manufacturer-recommended coolant blend.
What if my coolant level drops quickly?
A rapid decrease in coolant levels is often a sign of a leak or a failing component, such as a radiator, water pump, or head gasket. If you find yourself adding coolant more than once every few weeks, it’s time to have your vehicle inspected by a mechanic. Monitoring how to check coolant levels regularly helps you catch these problems before they cause severe engine damage.
Is it safe to open the radiator cap?
Yes, but only when the engine is completely cool. Opening the cap on a hot engine can cause dangerous steam or hot coolant to spray out, leading to serious burns. Always wait at least 30 minutes after turning off the engine before attempting to remove the radiator cap. Following this rule is an essential part of how to check coolant levels safely.
Why does coolant come in different colors?
Coolant colors—such as green, orange, pink, or blue—indicate different chemical formulations. They are not interchangeable. Mixing incompatible coolants can reduce effectiveness and damage your engine. When learning how to check coolant levels, always match the coolant type to the specifications in your car’s manual.
Do I need to flush my coolant system regularly?
Yes. Even if you know how to check coolant levels regularly, coolant eventually loses its protective properties. Most manufacturers recommend flushing and replacing coolant every 2 to 5 years. This process removes debris, prevents corrosion, and keeps the system running efficiently. Checking levels ensures you stay topped up, while flushing keeps the fluid itself in good condition.
Can low coolant cause my car to overheat?
Absolutely. Low coolant levels mean the engine cannot regulate its temperature properly. Overheating can occur quickly, leading to serious damage such as warped cylinder heads or a blown head gasket. This is why understanding how to check coolant levels is one of the most critical habits for car owners.
Conclusion
By now, you’ve learned the complete process of how to check coolant levels, why it matters, the tools you’ll need, and the mistakes you should avoid. Coolant is more than just a colored liquid under your hood—it is the lifeblood of your engine’s temperature regulation system. Keeping it at the proper level ensures your vehicle runs smoothly, prevents overheating, and protects against costly breakdowns that could otherwise leave you stranded on the side of the road.
The beauty of understanding how to check coolant levels lies in its simplicity. You don’t need advanced mechanical skills or expensive tools—just a flashlight, gloves, and a careful approach. With a few minutes of attention each month, you can safeguard thousands of dollars’ worth of engine components and extend your vehicle’s lifespan. This proactive maintenance habit is something every driver, from new car owners to seasoned enthusiasts, should adopt.
Another critical takeaway is safety. Many drivers make the mistake of rushing into the process without waiting for the engine to cool or without securing the reservoir cap after inspection. Both errors can have serious consequences. By following the guidelines in this article, you not only know how to check coolant levels but also how to do it safely and effectively, protecting both yourself and your vehicle.
Don’t forget that checking levels is only part of the bigger picture. Even if you’ve mastered how to check coolant levels, it’s equally important to monitor the condition of the fluid itself and to follow your car manufacturer’s schedule for flushing and replacing coolant. Staying on top of both checks and replacements ensures that your coolant remains effective in preventing corrosion, freezing, and overheating.
In the long run, developing the habit of regular coolant checks saves money, improves safety, and helps you drive with confidence. It’s a small investment of time that yields big benefits. Think of it as part of your broader car care strategy—alongside checking oil, tire pressure, and brakes. Each of these simple tasks plays a role in keeping your car reliable and roadworthy.
To conclude, knowing how to check coolant levels is not optional—it’s an essential skill for every driver. By taking responsibility for this basic maintenance step, you empower yourself to prevent avoidable problems, reduce repair costs, and ensure that your car remains ready for whatever journey lies ahead. Make it a habit, and your vehicle will reward you with years of dependable service.