
How to Check Car Suspension: Why It Matters Before Problems Escalate
If your ride feels bouncy, drifts on turns, or clunks over speed bumps, it’s time to learn how to check car suspension with confidence. Your suspension isn’t just about comfort—it’s a core safety system that keeps tires gripping the road, stabilizes weight transfer, and shortens stopping distances. In this guide, you’ll discover how to check car suspension using simple driveway tests and clear inspection cues so you can spot issues early and plan smart repairs.
Many drivers assume suspension problems are complicated or require a lift, but you can start right at home. We’ll outline how to check car suspension by reading tire wear patterns, listening for distinct noises, and measuring ride height and rebound. You’ll also learn how to check car suspension components—like struts, shocks, bushings, ball joints, and tie-rod ends—without guesswork. Each section builds from quick checks to deeper diagnostics so you know when a DIY fix is reasonable and when professional alignment or component replacement is the safer move.
A clear process matters. By following our step-by-step approach to how to check car suspension, you’ll avoid common pitfalls such as misreading a noise source or ignoring telltale leaks. We include safety guidelines, tool recommendations, and a troubleshooting table to connect symptoms with likely causes. Whether you’re preparing for a road trip, buying a used car, or chasing down a vague rattle, understanding how to check car suspension will help you protect tires, brakes, and steering components—and ultimately, your wallet.
Ready to begin? The next sections explain how to check car suspension by first recognizing early warning signs, then performing simple bounce and roll tests, and finally inspecting individual parts. By the end, you’ll know exactly how to check car suspension like a pro, with clear pass/fail criteria you can trust.
Key Signs Your Suspension Needs Attention
Before diving into the step-by-step process of how to check car suspension, it’s essential to recognize the common red flags that signal trouble. Most suspension problems reveal themselves gradually, but drivers often dismiss early symptoms as normal wear. Ignoring these signals can lead to uneven tire damage, longer stopping distances, and even dangerous handling on wet or winding roads.
One of the clearest indicators is unusual tire wear. If you notice bald spots, scalloping, or uneven tread depth across your tires, it may suggest that your shocks and struts aren’t keeping the wheels firmly on the ground. Another strong sign is a constant pulling to one side, which drivers often mistake for a wheel alignment issue. While alignment does play a role, suspension wear can be the root cause. Knowing how to check car suspension lets you separate minor alignment needs from more serious structural faults.
Noise is another giveaway. Listen for clunks, rattles, or squeaks when you drive over bumps or make sharp turns. These sounds often come from worn bushings, ball joints, or mounts. Vibrations in the steering wheel or excessive body roll when cornering also point toward failing shocks or struts. Learning how to check car suspension by paying attention to sounds and sensations ensures you don’t overlook these small but telling cues.
Don’t forget about ride quality. If the car feels excessively bouncy after hitting a bump or continues to sway after a lane change, your suspension isn’t stabilizing properly. Fluid leaks around shocks and struts are another visual clue. These issues are easier to diagnose once you know how to check car suspension thoroughly, from external inspection to hands-on testing. Spotting these early warnings equips you to act before minor wear turns into costly repairs or unsafe driving conditions.
Safety First & Tools You’ll Need
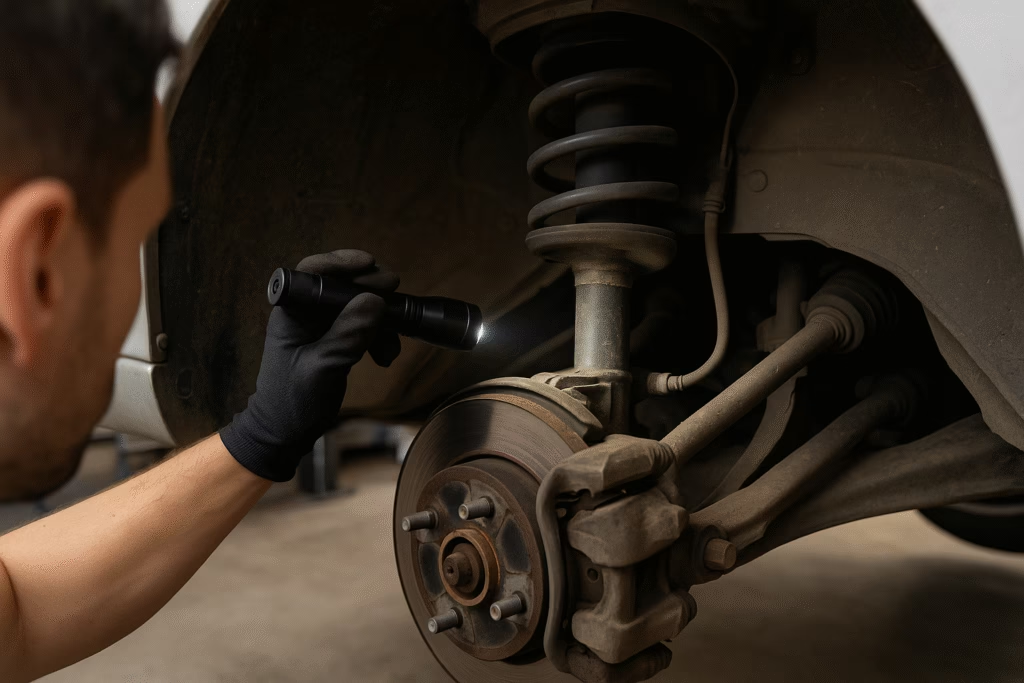
Learning how to check car suspension properly begins with safety. Suspension components sit close to tires, brakes, and undercarriage parts, which means you’ll often be working in tight spaces. To avoid injury, start by parking on a flat, stable surface and engaging the parking brake. Place wheel chocks behind the tires to prevent rolling. If you’re lifting the vehicle, always use a hydraulic jack rated for your car’s weight and pair it with jack stands—never rely on the jack alone. Good lighting is just as crucial because small leaks and cracks can be missed in poor visibility.
As you prepare for how to check car suspension, gather essential tools. A flashlight or headlamp will help you inspect hidden areas around struts and bushings. A pry bar is useful for testing play in ball joints or control arms. A simple measuring tape can confirm ride height consistency from one corner of the car to another. Gloves and safety glasses protect you from sharp edges and debris, while a torque wrench ensures that any bolts you loosen and retighten are secured to manufacturer specifications.
While some suspension checks are visual, others require a hands-on approach. For example, learning how to check car suspension includes performing a bounce test. You’ll need a clean surface to press down on the hood or trunk without slipping. Chalk or masking tape can help you mark wheel alignment when testing steering components. If you plan to rotate or remove wheels during inspection, a lug wrench and breaker bar should also be part of your toolkit.
Equipping yourself with the right tools not only makes the process of how to check car suspension easier but also more accurate. Improvising with the wrong equipment can lead to misdiagnosis or even damage. By investing in basic garage gear, you’ll set yourself up for reliable inspections now and safer driving later. In the next section, you’ll learn how to apply these tools for quick driveway tests that reveal suspension health without a full teardown.
Quick Driveway Tests
One of the easiest ways to begin learning how to check car suspension is by performing simple driveway tests. These methods require little more than your senses and a few minutes of attention. They’re not only effective for catching obvious problems but also a great way to build confidence before you move on to more detailed inspections. Think of these tests as your first line of defense against suspension failure.
Start with the bounce test. Position yourself at the front of the vehicle, press firmly down on the hood, and release. The car should rise and settle back into position almost immediately. If it continues bouncing more than once or twice, your shocks or struts may be worn out. Repeat this process on the rear of the car. By doing this, you’re actively practicing how to check car suspension for rebound control, one of the most important roles of a healthy suspension system.
Next, conduct a roll test. While parked, push down on one side of the car near the fender. A properly working suspension will resist rolling too far and quickly return to balance. Excessive leaning indicates worn sway bars or bushings. This hands-on check reinforces how to check car suspension without needing any tools. Make sure to perform it on both driver and passenger sides for consistency.
Another effective method is the steering response test. With the car running and parked, turn the wheel fully left and right. Listen for clunks or grinding noises. If you feel unusual resistance or looseness, suspension joints or tie rods may be failing. Completing these tests demonstrates how to check car suspension in a way anyone can manage at home. While these quick checks don’t replace a professional inspection, they highlight issues early and give you clear signs to investigate further before expensive damage occurs.
Detailed Component Inspection
After completing quick driveway checks, the next stage in mastering how to check car suspension is inspecting individual components. This approach gives you a closer look at the parts most likely to wear out and affect driving performance. Begin by removing the wheels if possible, since this exposes struts, shocks, springs, and control arms. With the wheel off, shine a flashlight into the suspension area and look for leaks, rust, or cracked bushings. Any visible fluid on a shock absorber is a clear sign of failure. Understanding how to check car suspension visually is a foundational step in spotting early damage.
Next, inspect the ball joints and tie-rod ends. Grab the wheel at the 12 and 6 o’clock positions and try to rock it. Excessive movement usually points to worn ball joints. Repeat at the 3 and 9 o’clock positions to check tie-rod play. If you feel looseness or hear clicking, replacement is likely necessary. These small but crucial parts directly affect steering stability, so including them when learning how to check car suspension is non-negotiable.
Springs and sway bars should also be reviewed. Look for cracked coils, sagging springs, or damaged bushings where the sway bar connects to the chassis. Worn or missing rubber can produce loud clunks over bumps. By carefully noting these conditions, you’ll understand more deeply how to check car suspension in ways mechanics do during professional inspections.
Finally, measure ride height. Place the car on level ground and use a tape measure to check the distance from the wheel arch to the ground at each corner. Differences greater than one inch can signal spring fatigue or uneven wear. Document your findings and compare them against factory specifications if available. This method of how to check car suspension helps verify whether the vehicle sits evenly and whether underlying damage is affecting its balance and handling.
Step-by-Step Guide: How to Check Car Suspension
Step 1: Perform the Bounce and Roll Tests
The first step in how to check car suspension is performing bounce and roll tests. Start by pressing firmly down on the hood and trunk, releasing quickly to watch the rebound. A healthy suspension will allow only one to two controlled bounces before stabilizing. If the car continues bouncing, shocks or struts are likely worn. Repeat the process at each corner of the vehicle. Next, push down on one side near the fender to test body roll. Too much leaning or delayed recovery means stabilizer bars or bushings may be compromised. This simple routine is the foundation of learning how to check car suspension because it highlights major weaknesses without specialized tools.
Keep your senses sharp—listen for squeaks, clunks, or grinding sounds while testing. These noises often point to loose mounts, bushings, or metal-on-metal contact. Take note of the results so you can compare them later when doing a detailed inspection. Practicing how to check car suspension systematically ensures nothing slips through unnoticed.
Step 2: Inspect Components and Joints
The second step in how to check car suspension involves hands-on inspection. Safely lift the car with a jack and place jack stands under the frame. With the wheel removed, examine shocks and struts for visible leaks, dents, or rust. Grip the wheel at the 12 and 6 o’clock positions and shake gently to feel for play in ball joints. Move to the 3 and 9 o’clock positions to test tie rods. Any looseness or knocking suggests wear. Don’t forget sway bar links and bushings—look for cracked rubber or broken connections. Knowing how to check car suspension at this level provides a professional-grade overview without expensive shop visits.
Record any abnormalities such as uneven ride height, visible damage, or fluid leaks. This detailed method of how to check car suspension helps identify exact parts that need replacement, preventing misdiagnosis and wasted repairs.
Step 3: Road Test for Confirmation
The final step in how to check car suspension is a controlled road test. Choose a safe route with speed bumps or uneven pavement. Pay attention to how the car responds: excessive bouncing after bumps, nose-diving during braking, or drifting in corners are all signs of suspension weakness. Keep your hands light on the wheel and listen closely for rattles or clunks that weren’t obvious during static checks. Road testing is essential because it simulates real-world conditions and confirms earlier findings. Practicing how to check car suspension in motion ensures your evaluation is complete and reliable.
By following these three steps—bounce tests, component inspection, and road evaluation—you’ll know exactly how to check car suspension thoroughly. This process empowers you to catch issues before they worsen, saving money and enhancing safety.
Common Mistakes to Avoid When Checking Suspension
Even after learning how to check car suspension, many drivers make errors that lead to incomplete or misleading results. One common mistake is rushing through the process. A quick glance under the car may miss critical signs like minor leaks or small cracks in bushings. Always take your time, use proper lighting, and inspect each component carefully. Another error is failing to perform tests on all four corners of the vehicle. Suspension issues often affect one side more than the other, and skipping corners undermines the accuracy of your assessment.
A second mistake when practicing how to check car suspension is ignoring tire condition. Drivers often assume tire wear is a separate problem, but in reality, uneven tread patterns are one of the most reliable indicators of suspension trouble. Checking suspension without examining tires risks missing the connection between alignment, shocks, and tread wear. Additionally, many people overlook noises during road tests. Dismissing clunks or squeaks as “normal aging” prevents you from catching early wear that could escalate into expensive repairs.
Another pitfall is testing without proper safety precautions. Attempting how to check car suspension while relying only on a jack, without jack stands, can be extremely dangerous. The same applies to using the wrong tools, like substituting a screwdriver for a pry bar. These shortcuts compromise accuracy and put your safety at risk. Always equip yourself with the correct gear and follow safety best practices.
Finally, some drivers misinterpret results. For example, mistaking alignment issues for suspension wear, or overlooking steering components when evaluating suspension. To avoid this, compare your findings against professional checklists or manufacturer specifications. Understanding how to check car suspension fully means recognizing these nuances and verifying symptoms before making repairs. By avoiding these common mistakes, you’ll gain more accurate insights and extend the lifespan of your car’s suspension system.
Troubleshooting Cheat-Sheet
As you continue mastering how to check car suspension, it helps to have a quick reference for matching symptoms with likely causes. This troubleshooting table saves time by pointing you directly toward the component that needs inspection. Use it after your driveway tests and visual checks to connect the dots between what you observe and the underlying issue. Whether you’re chasing down a rattle or noticing uneven handling, this guide will sharpen your ability to diagnose problems effectively.
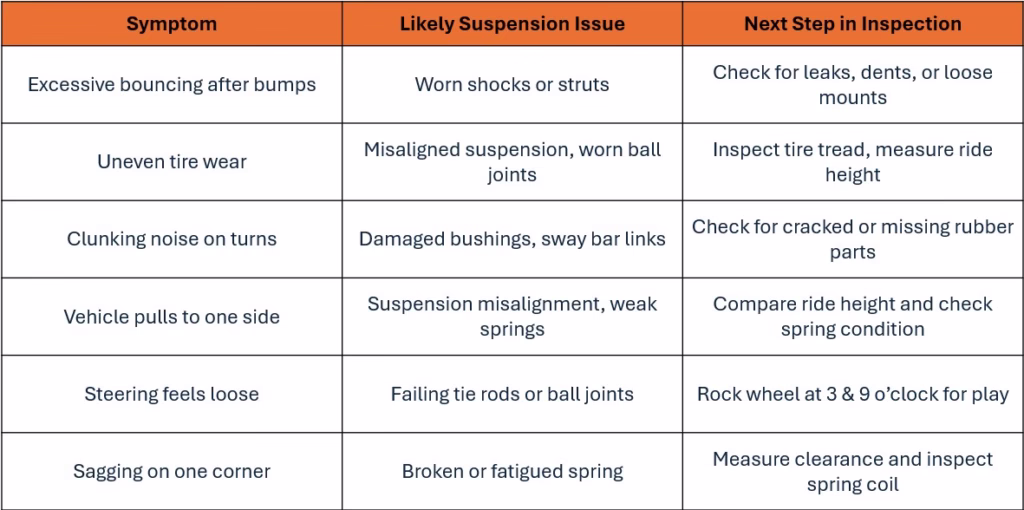
By pairing symptoms with potential causes, you’ll streamline the process of how to check car suspension and avoid unnecessary part replacements. This chart doesn’t replace a full inspection, but it helps you quickly narrow down what to look for. Think of it as a roadmap for your diagnostics, ensuring that each observation leads to a logical, informed next step.
Preventive Maintenance Schedule
Understanding how to check car suspension is valuable, but keeping your suspension healthy also depends on following a preventive maintenance schedule. Many drivers wait until symptoms become obvious, but by then, the damage has often spread to tires, brakes, or steering. A consistent schedule ensures you catch issues early, extend the lifespan of components, and avoid costly breakdowns.
Start by visually inspecting your suspension every 6 months or 6,000 miles. This check should include looking for fluid leaks around shocks and struts, examining bushings for cracks, and confirming ride height consistency. Pair this with a tire rotation to check for unusual wear patterns. Practicing how to check car suspension during routine tire service makes the process efficient and prevents problems from going unnoticed.
Every 12 months or 12,000 miles, perform a deeper hands-on inspection. Jack up the car, test for play in ball joints and tie rods, and evaluate the condition of springs and sway bars. This yearly inspection ensures that small signs of wear don’t evolve into serious handling issues. Incorporating how to check car suspension into your annual maintenance routine is as important as checking oil or brakes.
For vehicles that regularly tow, carry heavy loads, or drive on rough terrain, inspections should be even more frequent. Shocks and struts may wear twice as fast under these conditions. In such cases, check suspension every 3 months. This proactive approach reinforces your understanding of how to check car suspension by making it a normal part of ownership rather than an emergency fix.
Finally, follow manufacturer guidelines for replacement intervals. Most shocks and struts last between 50,000–100,000 miles, but performance varies by driving style and conditions. By combining scheduled checks with manufacturer advice, you’ll master how to check car suspension in a way that maximizes safety and saves money over the long run.
FAQ: How to Check Car Suspension
How often should I check my suspension?
A good rule of thumb is to practice how to check car suspension every 6 months or whenever you rotate your tires. This schedule helps you catch wear patterns early and prevent minor issues from becoming major repairs.
Can I check suspension without removing the wheels?
Yes. Learning how to check car suspension starts with simple bounce tests, steering checks, and listening for noises—all of which can be done with the wheels on. However, for a thorough inspection of shocks, struts, and bushings, wheel removal is recommended.
What tools do I need to inspect suspension at home?
At minimum, you’ll need a flashlight, jack stands, a lug wrench, and a measuring tape. A pry bar and torque wrench improve accuracy. Having the right gear ensures your method of how to check car suspension is both safe and effective.
Are uneven tires always a suspension problem?
Not always. Uneven tire wear can also stem from poor alignment or underinflation. That’s why understanding how to check car suspension thoroughly involves connecting tire wear with other factors like shocks, struts, and ball joints.
When should I see a professional mechanic?
If you’ve applied the steps for how to check car suspension and found fluid leaks, severe sagging, or steering looseness, it’s best to consult a certified mechanic. Professional shops have alignment racks and diagnostic tools that go beyond DIY checks.
Is suspension maintenance expensive?
Costs vary depending on parts and labor. Basic bushings are inexpensive, while shocks and struts can be costlier. Regularly practicing how to check car suspension helps reduce costs by addressing problems before they affect multiple systems.

Conclusion
By now, you’ve learned step by step how to check car suspension in ways that combine safety, practicality, and professional insight. From quick bounce tests to detailed component inspections and road tests, each method gives you confidence in evaluating the health of your suspension system. What may have seemed intimidating at first becomes manageable when broken down into clear checks you can perform in your driveway or garage.
The importance of understanding how to check car suspension cannot be overstated. A well-maintained suspension system doesn’t just improve comfort—it directly impacts braking distance, tire life, and steering control. Ignoring suspension issues can lead to costly repairs or even dangerous situations on the road. On the other hand, catching problems early gives you the opportunity to plan affordable repairs and extend the life of your car.
Remember that how to check car suspension is not a one-time task. Making it part of your regular maintenance routine ensures that you’re always ahead of potential issues. Combine the techniques outlined here with a preventive maintenance schedule, and you’ll enjoy smoother rides, safer handling, and fewer surprises at the repair shop. The troubleshooting cheat-sheet provided also helps you connect symptoms with causes quickly, so you can diagnose problems more effectively.
Whether you’re preparing for a long road trip, evaluating a used car purchase, or simply making sure your daily commute stays safe, mastering how to check car suspension equips you with valuable knowledge. If at any point you feel unsure, don’t hesitate to consult a trusted mechanic. Ultimately, a proactive approach to suspension care gives you peace of mind, saves money, and keeps your vehicle performing at its best mile after mile.