Introduction
Few household mishaps are as frustrating as discovering a bleach stain on your favorite shirt, rug, or upholstery. Unlike ordinary stains, bleach marks aren’t just surface blemishes—they are chemical burns that permanently strip away the fabric’s natural dye. This makes them especially challenging to handle. That’s why learning how to remove bleach stains quickly with proven tricks is such an essential skill. With the right techniques, you can minimize the damage, disguise the discoloration, and in many cases, restore the look of your garment or textile enough to keep it in use.
The science behind bleach stains is simple but harsh: sodium hypochlorite, the active ingredient in most household bleach, is designed to break down organic matter and destroy pigments. When it comes into contact with colored fabric, it essentially erases the dye, leaving a lighter or completely white patch. Many people assume nothing can be done after this happens. However, when you understand how to remove bleach stains, you realize that while you cannot undo the chemical reaction, you can repair or disguise the damage. Techniques like neutralizing the bleach, applying fabric markers, re-dyeing, or blending the area with household tricks can give surprisingly effective results.
Another reason to learn how to remove bleach stains is financial and emotional value. Clothes, carpets, and upholstery are often expensive, and throwing them away because of a single stain can feel like a waste. Beyond money, many of these items carry sentimental value—perhaps a favorite hoodie, a gift from a loved one, or an heirloom rug. Instead of giving up, applying tried-and-true methods allows you to salvage what might otherwise be lost. Knowing that you have the ability to address bleach mishaps empowers you to handle accidents calmly and confidently.
In this guide, we’ll cover everything you need to know about how to remove bleach stains. We’ll start by explaining why bleach stains matter, then look at common mistakes people make when trying to fix them. From there, we’ll walk you through a step-by-step method for tackling stains on different materials, share frequently asked questions to address common concerns, and end with a conclusion that reinforces best practices. By the end, you’ll be equipped with practical, affordable solutions to handle bleach stains at home like a pro.
Why Removing Bleach Stains Matters
At first glance, bleach stains may seem like a simple cosmetic issue, but in reality, they have long-term consequences for your clothing, furniture, and even your confidence. Understanding how to remove bleach stains is crucial because these marks are unlike ordinary dirt or food spills. They result from a chemical reaction that strips the fabric of its dye, leaving behind a patch that looks faded, worn, or even burnt. If not treated or disguised, the damage becomes permanent, making the fabric look old long before its time. For anyone who values their wardrobe or household items, learning how to remove bleach stains is not just optional—it’s essential.
One major reason how to remove bleach stains matters is the financial cost of replacement. High-quality garments, carpets, and upholstery can be expensive, and a single splash of bleach should not mean an automatic trip to the store for something new. By knowing how to respond effectively, you can restore items to usable condition, saving both money and resources. This not only benefits your wallet but also promotes sustainability. Repairing and reusing fabrics reduces waste and keeps textiles out of landfills, an increasingly important consideration in today’s environmentally conscious world.
Beyond money, there’s also emotional value attached to many items. A favorite shirt, a sofa gifted by a loved one, or even a decorative rug may hold sentimental meaning. Discovering a bleach mark can feel devastating because it seems irreversible. However, when you know how to remove bleach stains, you gain the ability to salvage these cherished belongings. Even if full restoration isn’t possible, minimizing the visibility of the stain allows you to keep using and enjoying the item without feeling embarrassed or disappointed every time you see the mark.
Finally, there’s the confidence factor. Wearing clothes with obvious bleach stains can undermine your self-image. Hosting guests on furniture with visible bleach patches can make your home feel less welcoming. Taking the time to learn how to remove bleach stains ensures that your appearance and living space reflect care and attention to detail. It transforms accidents from crises into manageable challenges, giving you the peace of mind that no mishap is truly beyond repair.
Common Mistakes When Removing Bleach Stains
When people first discover bleach marks on fabric, the immediate reaction is often panic. Unfortunately, panic leads to hasty decisions, and that is where many go wrong. One of the biggest errors in learning how to remove bleach stains is treating them like ordinary stains. Scrubbing vigorously, soaking the fabric in water, or adding more detergent will not work. Unlike coffee or ink stains, bleach doesn’t leave behind residue—it strips away the dye completely. Aggressive scrubbing only weakens the fibers, leaving them frayed or even torn, while doing nothing to restore the lost color.
Another common mistake in how to remove bleach stains is applying more bleach in hopes of “evening out” the mark. This is a recipe for disaster. Instead of blending the area, it often enlarges the stain, leaving a bigger, more noticeable patch. Similarly, using harsh chemicals such as vinegar, alcohol, or ammonia can make things worse. These substances react unpredictably with bleach and can permanently damage the fabric. While household remedies can sometimes help, it’s important to research and choose safe, proven methods rather than relying on trial and error in the moment.
A frequently overlooked error is skipping the neutralization step. Once bleach touches fabric, it keeps working until it is stopped. If you go straight to adding dye or using a fabric marker without first neutralizing the bleach, the damage will continue underneath, undoing your efforts. Anyone serious about how to remove bleach stains should use baking soda paste, hydrogen peroxide, or a commercial neutralizer before attempting restoration. This halts the chemical process and ensures that the stain does not spread.
Finally, many people forget to test their chosen solution on a hidden section of the fabric. Whether you are using a dye pen, fabric paint, or a re-dyeing kit, colors may not always match perfectly. Skipping a test run risks creating mismatched shades that look even worse than the original bleach spot. Patience and precision are key. By avoiding these common mistakes in how to remove bleach stains, you improve your chances of achieving a repair that looks natural, durable, and professional.
Step-by-Step Guide: How to Remove Bleach Stains at Home
Step 1: Neutralize the Bleach Immediately
The first and most critical stage in mastering how to remove bleach stains is to neutralize the bleach as quickly as possible. Unlike dirt, oil, or food stains, bleach is a chemical agent that continues working long after it first touches the fabric. This means that if you don’t stop the chemical reaction, the bleach will continue to strip color from the material and weaken the fibers over time. By neutralizing the bleach immediately, you prevent the stain from spreading further and set the stage for successful restoration. Many people make the mistake of jumping straight to covering up the mark with fabric dye or a marker, but without neutralization, any repair will be short-lived because the bleach is still active beneath the surface.
To begin this process of how to remove bleach stains, start by blotting the affected area with a clean, dry cloth to remove any excess liquid. Avoid rubbing, as this spreads the bleach and can damage the fibers. Next, create a simple neutralizing paste by mixing baking soda with water until it forms a thick consistency. Gently apply this paste to the stained area, pressing it into the fabric without scrubbing. Baking soda works because it neutralizes the high alkalinity of bleach, stopping the reaction in its tracks. Let the paste sit for at least five to ten minutes before rinsing it off with cool water. For larger surfaces like carpets or upholstery, a diluted solution of hydrogen peroxide and water can be sprayed or dabbed onto the area for similar results.
Another helpful method in how to remove bleach stains is using a commercial bleach neutralizer. These products are specially designed to stop bleach from continuing its work on fabrics and are widely available online or in cleaning supply stores. While they can be more expensive than household remedies, they are often faster and more effective, particularly for large stains. If you don’t have access to these products, however, the baking soda paste method is a reliable and budget-friendly solution.
Once the bleach has been neutralized, gently blot the area dry with a towel and allow it to air dry completely. Avoid using heat sources like hair dryers or placing the fabric in direct sunlight, as these can set any discoloration and weaken the fibers further. Neutralizing bleach may not restore color on its own, but it is the foundation of every other repair step. Without it, your efforts to recolor or disguise the mark will fail. By understanding and applying this critical first step in how to remove bleach stains, you ensure that the damage is contained and the fabric is ready for the next stage of restoration.
Step 2: Restore or Blend the Color
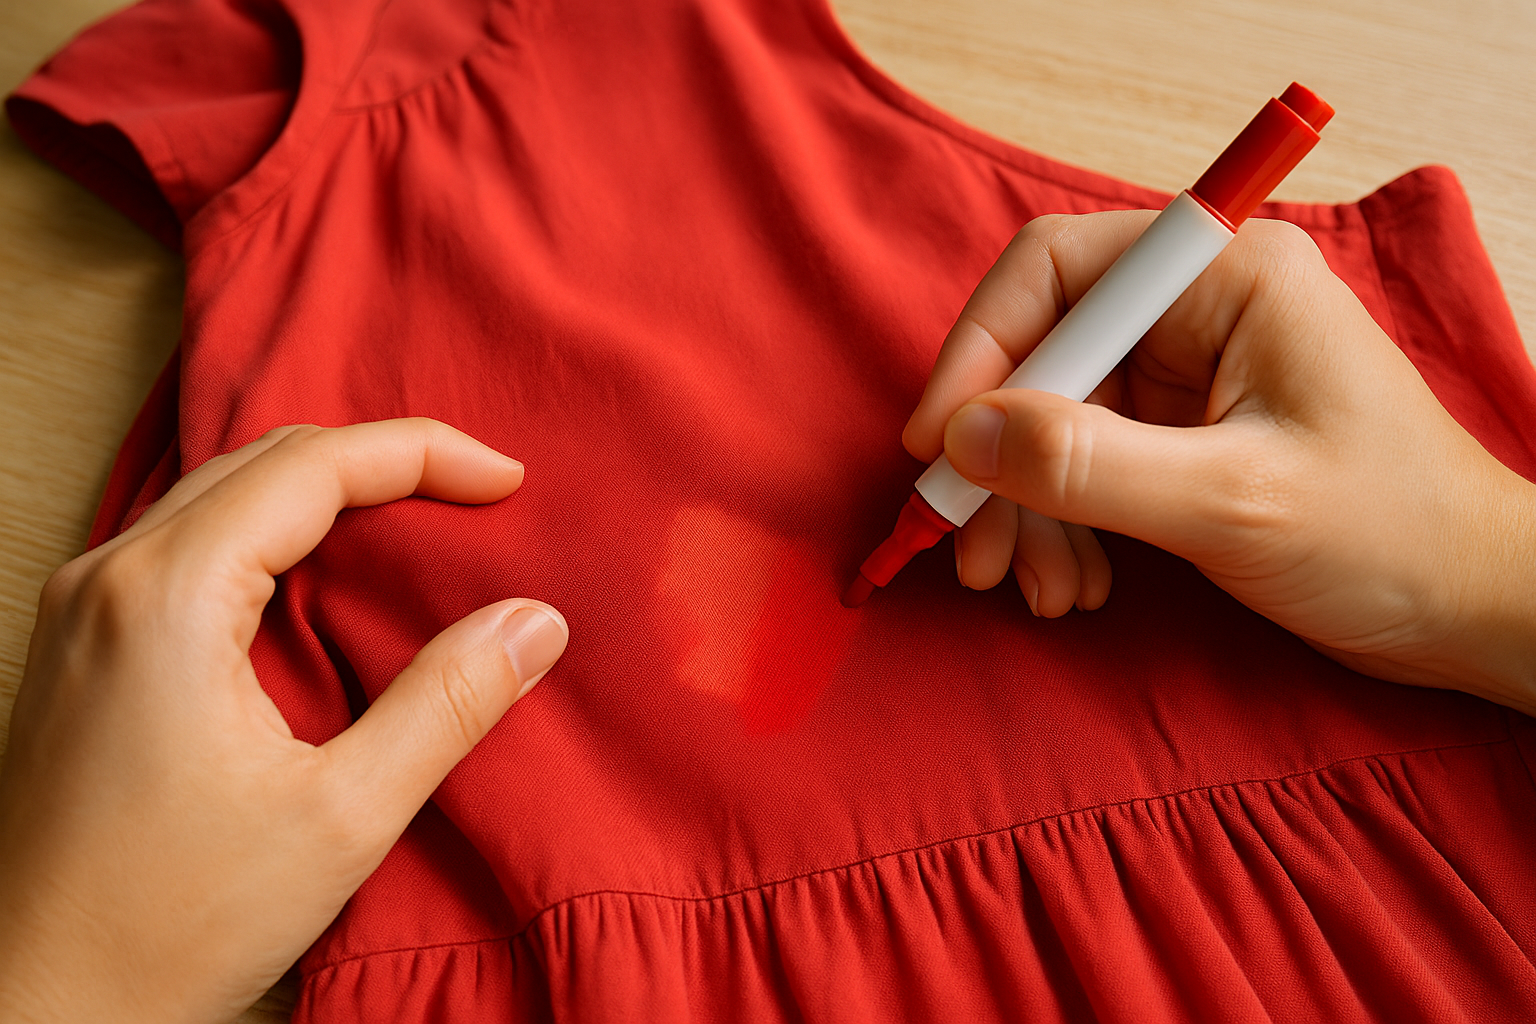
After you’ve neutralized the chemical reaction, the next stage in how to remove bleach stains is restoring or blending the color of the affected fabric. Since bleach doesn’t leave behind a traditional stain but instead removes pigment, the challenge lies in putting color back into the fabric or disguising the faded area so it looks natural. This step is often the most rewarding because it brings visible improvement. While you can’t always bring the material back to its original state perfectly, a careful approach can make the stain nearly invisible to anyone who isn’t looking closely.
One of the simplest tools for this part of how to remove bleach stains is a fabric marker. These markers are available in a wide range of colors and are specifically designed for textiles. To use them effectively, first choose a marker that closely matches the color of the garment or fabric. Always test the marker on an inside seam or hidden area before applying it directly to the bleach spot. Once you’re confident the shade matches, apply the marker in light, even strokes over the discolored area. Allow it to dry completely, and then add additional layers as needed to blend with the surrounding fabric. Patience is important here, as rushing can lead to streaks or oversaturation.
For larger areas or fabrics where a marker won’t suffice, a re-dyeing kit may be the better option. When considering how to remove bleach stains on items like jeans, sweaters, or curtains, dye kits provide more comprehensive coverage. Follow the instructions carefully and always wear gloves to protect your hands from dye transfer. Applying the dye evenly is key, and it may require soaking the entire garment to avoid obvious patches. For multicolored or patterned fabrics, this can be trickier, so you may need to use a combination of fabric paints or specialty dyes to achieve a close match.
In the case of carpets or upholstery, spray-on fabric dyes or upholstery paint can be used. These products are designed to blend into larger surfaces, making them especially useful for high-traffic areas that might otherwise require professional repair. Before applying, mask off surrounding areas with painter’s tape or cloths to avoid overspray. Once applied, let the area dry thoroughly before walking on it or placing objects back on top. Using fabric sprays or paints requires a steady hand, but they can transform a ruined-looking carpet into one that looks nearly new.
It’s important to remember that how to remove bleach stains isn’t always about perfect restoration. Sometimes, the goal is to make the discoloration far less noticeable, so the item remains wearable or usable. With the right tools—fabric markers, re-dyeing kits, or spray-on fabric colors—you can effectively disguise bleach stains and extend the life of your garments or furnishings. This step, when done carefully, restores confidence and prevents the frustration of feeling like a treasured item has been permanently ruined.
Step 3: Protect and Prevent Future Damage
Once you’ve neutralized the bleach and blended the color, the final step in how to remove bleach stains is prevention. It may sound simple, but prevention is the most powerful tool you have for protecting your fabrics from future accidents. Bleach is a harsh chemical designed to disinfect and whiten, not to be gentle with everyday fabrics. By adopting a few habits and making small adjustments in how you handle it, you can significantly reduce the risk of damage. Prevention not only saves you time and stress but also extends the life of your garments, carpets, and upholstery.
The first habit to adopt in how to remove bleach stains prevention is safe storage. Always keep bleach in tightly sealed containers and store them in a location away from your laundry or clothing areas. Many accidents happen because bleach bottles are left open or too close to colored items. By keeping bleach in a separate cabinet or storage bin, you minimize the chances of accidental spills. If possible, designate one specific spot in your home for bleach storage, clearly labeled and out of reach of children and pets.
Another vital preventive practice is proper dilution. Using bleach straight from the bottle increases the severity of stains if it splashes on fabric. By pre-diluting bleach with water before using it, you lower the concentration, making any accidental contact less damaging. This is especially important when cleaning surfaces like tiles, sinks, or bathroom floors where splashing is common. Dilution not only reduces risks but also makes bleach more effective for everyday cleaning, since it works best when not overly concentrated.
For laundry purposes, consider switching to color-safe bleach alternatives. These products are designed to clean and disinfect without stripping dye from fabrics. They’re particularly useful in households where multiple family members handle laundry and accidents are more likely. Knowing how to remove bleach stains is valuable, but avoiding them altogether with safer products is even better. Color-safe bleach ensures that even if a spill occurs, the damage is far less severe, often leaving no visible mark.
Finally, take protective measures when handling bleach around fabrics. Always wear old clothing you don’t mind damaging, and cover nearby fabrics with towels or plastic sheets before starting any cleaning project. For carpets and upholstery, keep protective mats in high-risk areas like laundry rooms and kitchens. Simple steps like labeling spray bottles clearly and wearing gloves can also make a big difference. Practicing prevention is just as important as knowing how to remove bleach stains, because it turns potential disasters into non-events. By following these protective habits, you’ll dramatically reduce future accidents and maintain the quality and appearance of your fabrics for years to come.
FAQs About Removing Bleach Stains
Can bleach stains ever be completely removed?
One of the most common questions about how to remove bleach stains is whether they can ever be fully erased. Unfortunately, bleach does not leave behind a stain in the traditional sense—it chemically strips dye from the fibers. This means you cannot truly reverse the damage. However, you can disguise it so effectively that it becomes virtually invisible. Methods like fabric markers, re-dyeing kits, or even fabric paints can recolor the area. For carpets or upholstery, spray-on dyes are often effective. While the original color may not be perfectly restored, blending techniques can produce results that are indistinguishable to the casual observer. In practice, this feels as good as complete removal, even if technically the original dye has been lost.
Which fabrics respond best to bleach stain repair?
Not all fabrics are created equal when it comes to how to remove bleach stains. Natural fibers like cotton, wool, and denim are more forgiving because they absorb dyes and markers better, allowing for smoother blending. These fabrics often respond well to both fabric pens and full re-dyeing kits. Synthetic fabrics such as polyester and nylon are less porous, making color restoration more difficult. Blended fabrics fall somewhere in between, and results can vary. For delicate fabrics like silk or suede, attempting DIY fixes can actually make the situation worse, so professional cleaning or re-dyeing is recommended. Knowing your fabric type before choosing a method is crucial for the best outcome.
Is baking soda or vinegar safe to use on bleach stains?
A lot of people wonder if common household items like baking soda or vinegar can help with how to remove bleach stains. Baking soda is extremely useful in neutralizing bleach, especially right after a spill. By making a paste of baking soda and water and applying it to the affected area, you can stop the bleach from spreading further and causing additional damage. Vinegar, on the other hand, should not be mixed directly with bleach stains, as bleach and vinegar can react dangerously and release harmful fumes. Instead, stick to baking soda or hydrogen peroxide solutions for neutralization. Once the bleach has been neutralized, you can then move on to recoloring methods safely.
Can carpets and upholstery with bleach stains be fixed at home?
Yes, carpets and upholstery can often be salvaged when you know how to remove bleach stains. Small bleach spots on rugs or furniture can be treated with fabric markers or upholstery dye sprays to blend the discoloration. For larger areas, diluted fabric paint applied with a sponge is sometimes effective. The first step is always neutralization—using baking soda paste or a hydrogen peroxide mix to stop the bleach reaction. Once neutralized, recoloring becomes much more effective. While DIY fixes work well for minor stains, large or patterned upholstery may require professional treatment for a seamless finish. Still, home methods can save significant costs and extend the lifespan of your furniture.
How can I prevent bleach stains in the future?
Prevention is just as important as knowing how to remove bleach stains. The best strategy is to handle bleach cautiously from the start. Always store it in a separate, clearly labeled container and keep it away from colored fabrics. When cleaning, pre-dilute bleach with water to lessen the damage if a spill occurs. Wearing gloves, protective clothing, and covering nearby fabrics with old towels or plastic sheets also helps. For laundry, switching to color-safe bleach alternatives is one of the simplest ways to prevent stains altogether. These products clean effectively without stripping dyes. By combining careful handling with safer substitutes, you dramatically reduce the chances of bleach accidents and protect your fabrics in the long run.
Conclusion
By now, you’ve learned that how to remove bleach stains is less about reversing damage and more about controlling, disguising, and preventing it. Bleach doesn’t behave like other staining agents—it erases pigment entirely, leaving behind colorless patches that stand out against the surrounding fabric. While this may sound permanent, the techniques we’ve explored show that you can restore the look and function of your clothes, carpets, or upholstery with the right approach. Neutralizing the bleach immediately, carefully restoring color, and adopting preventive measures are the three pillars of success when handling bleach mishaps.
One of the biggest takeaways from understanding how to remove bleach stains is that quick action makes all the difference. Neutralizing the chemical reaction right away prevents the bleach from spreading and allows you to start restoration on stable ground. From there, fabric markers, dye kits, and upholstery sprays give you the ability to recolor and disguise damage. Even if perfect restoration isn’t always possible, most people find the repaired area blends well enough to keep items wearable or usable, saving both money and memories.
Prevention is equally important. Once you realize how destructive bleach can be, it becomes easier to adopt safer habits like storing it separately, diluting it before use, and switching to color-safe alternatives whenever possible. These small adjustments drastically reduce the risk of future accidents. Learning how to remove bleach stains is valuable, but preventing them in the first place saves even more time, energy, and frustration.
To wrap up, how to remove bleach stains is about combining practical skills with mindful care. It empowers you to handle accidents without panic and to keep valuable items in circulation rather than discarding them. Whether you’re repairing a beloved shirt, salvaging a sofa cushion, or disguising a patch on your carpet, the methods in this guide equip you with confidence and know-how.
📌 Read Similar Topics
- Fix Moen Shower Valve
- Door Latch Not Fully Retracting
- Ceiling Water Damage
- Dishwasher Replacement Cost
- Unsticking a Zipper
For additional expert guidance, explore these authoritative resources:
Wikipedia on Bleach,
CDC on Bleach Safety,
Good Housekeeping Stain Removal Guide.
In the end, bleach accidents don’t have to mean the end of your favorite items. By following the steps in this guide and making preventive care part of your routine, you’ll always be prepared to tackle stains calmly and effectively. With these proven tricks, you’ll know exactly how to remove bleach stains and restore confidence in your wardrobe and home.