How to Check Brake Pads: Introduction
Knowing how to check brake pads keeps you, your passengers, and your car safe. If you’ve ever wondered how to check brake pads without special tools, this guide explains a clear, safe process. We’ll cover setup, basic safety, and what visible signs matter most. By learning how to check brake pads the right way, you’ll spot problems early, avoid rotor damage, and time replacements before braking performance fades.
Instead of waiting for squeals or vibration, add regular inspections to your routine. You’ll learn where to look through the wheel spokes, how to identify the wear indicator tab, and how to judge remaining thickness. For background reading, see this overview of brake pads. We’ll also note when professional help is smart.
Whether you’re a first-time DIYer or a seasoned tinkerer, this walkthrough uses plain language and photo-ready steps. By the end, you’ll know how to check brake pads visually, how to check brake pads with a simple gauge, and how to check brake pads during a short test drive—so you can decide confidently when it’s time to replace them.
You’ll also learn basic terminology—pad backing plate, friction material, shim—and how each affects noise and feel. We’ll outline the few items you might want on hand (flashlight, ruler, latex gloves) and the simple precautions that prevent mistakes. If you’re anxious about doing this the first time, remember that learning how to check brake pads is observational, not invasive, and you can stop at any step. Follow along and practice how to check brake pads at your own pace.
How to Check Brake Pads: Safety & Tools
Before diving into how to check brake pads, prioritize safety and gather the right tools. Working around a vehicle’s braking system means you’ll be near heavy parts and potentially hot surfaces, so preparation is key. Park your car on a flat surface, engage the parking brake, and if possible, use wheel chocks. These simple steps reduce the chance of rolling while you learn how to check brake pads.
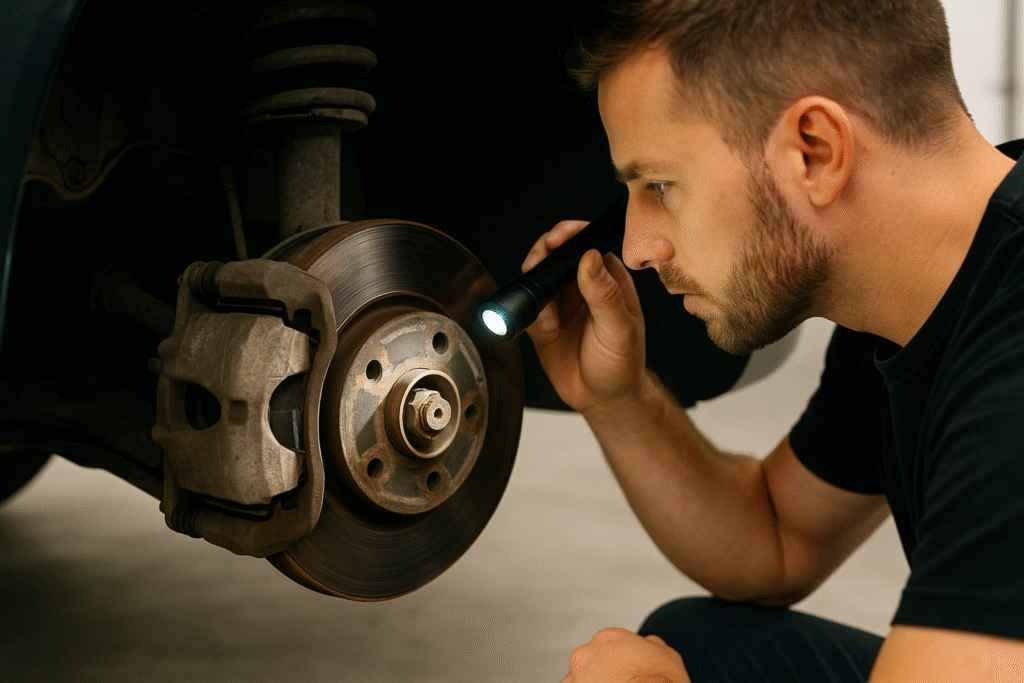
At a minimum, you’ll need a flashlight to see through the wheel spokes and gloves to keep your hands clean. For a deeper inspection, a jack and jack stands allow you to remove the wheels, giving you a clear look at the entire brake pad and rotor. Always follow the manufacturer’s instructions on lifting points. Safety goggles are strongly recommended too, since dust and rust may fall while you explore how to check brake pads.
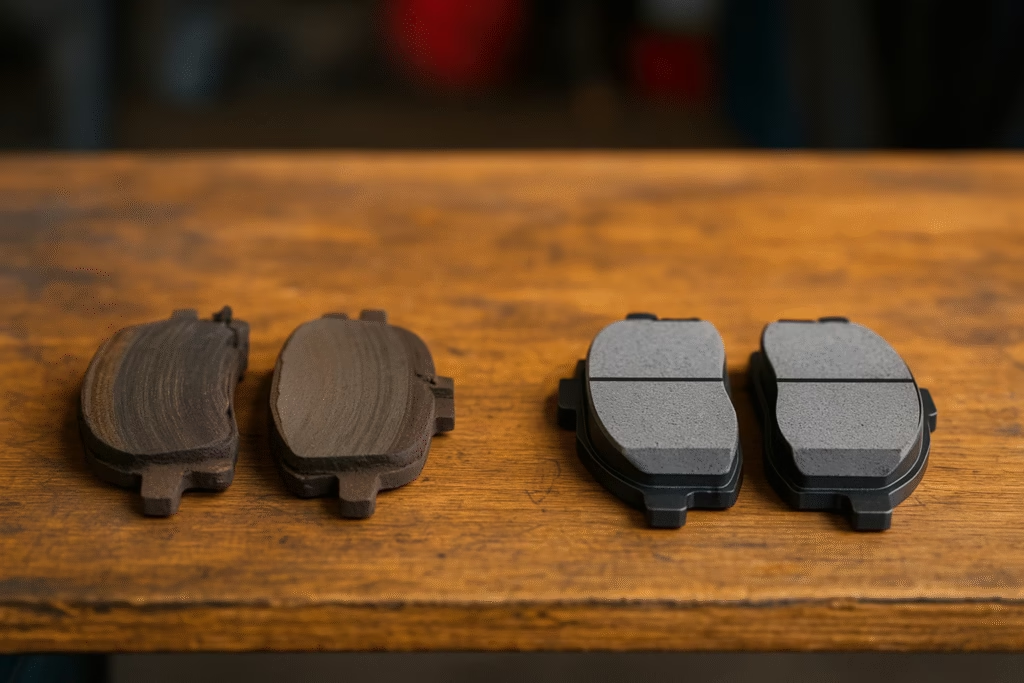
Many drivers assume checking brakes requires advanced gear, but simple tools like a ruler or brake pad gauge can measure thickness accurately. Most pads start around 10–12 millimeters thick. If you see 3 millimeters or less, replacement is advised. Keeping a notepad or phone handy for photos helps track wear over time. This record makes it easier to compare results each time you check.
Learning how to check brake pads isn’t only about spotting thin material. You’re also looking for uneven wear, cracked surfaces, or pads contaminated by oil or grease. Each can affect braking performance and may point to other issues like seized calipers. For official safety guidelines, review resources from the National Highway Traffic Safety Administration. Once you’ve gathered your essentials and reviewed basic safety, you’re ready for the hands-on inspection process.
How to Check Brake Pads: Visual Inspection
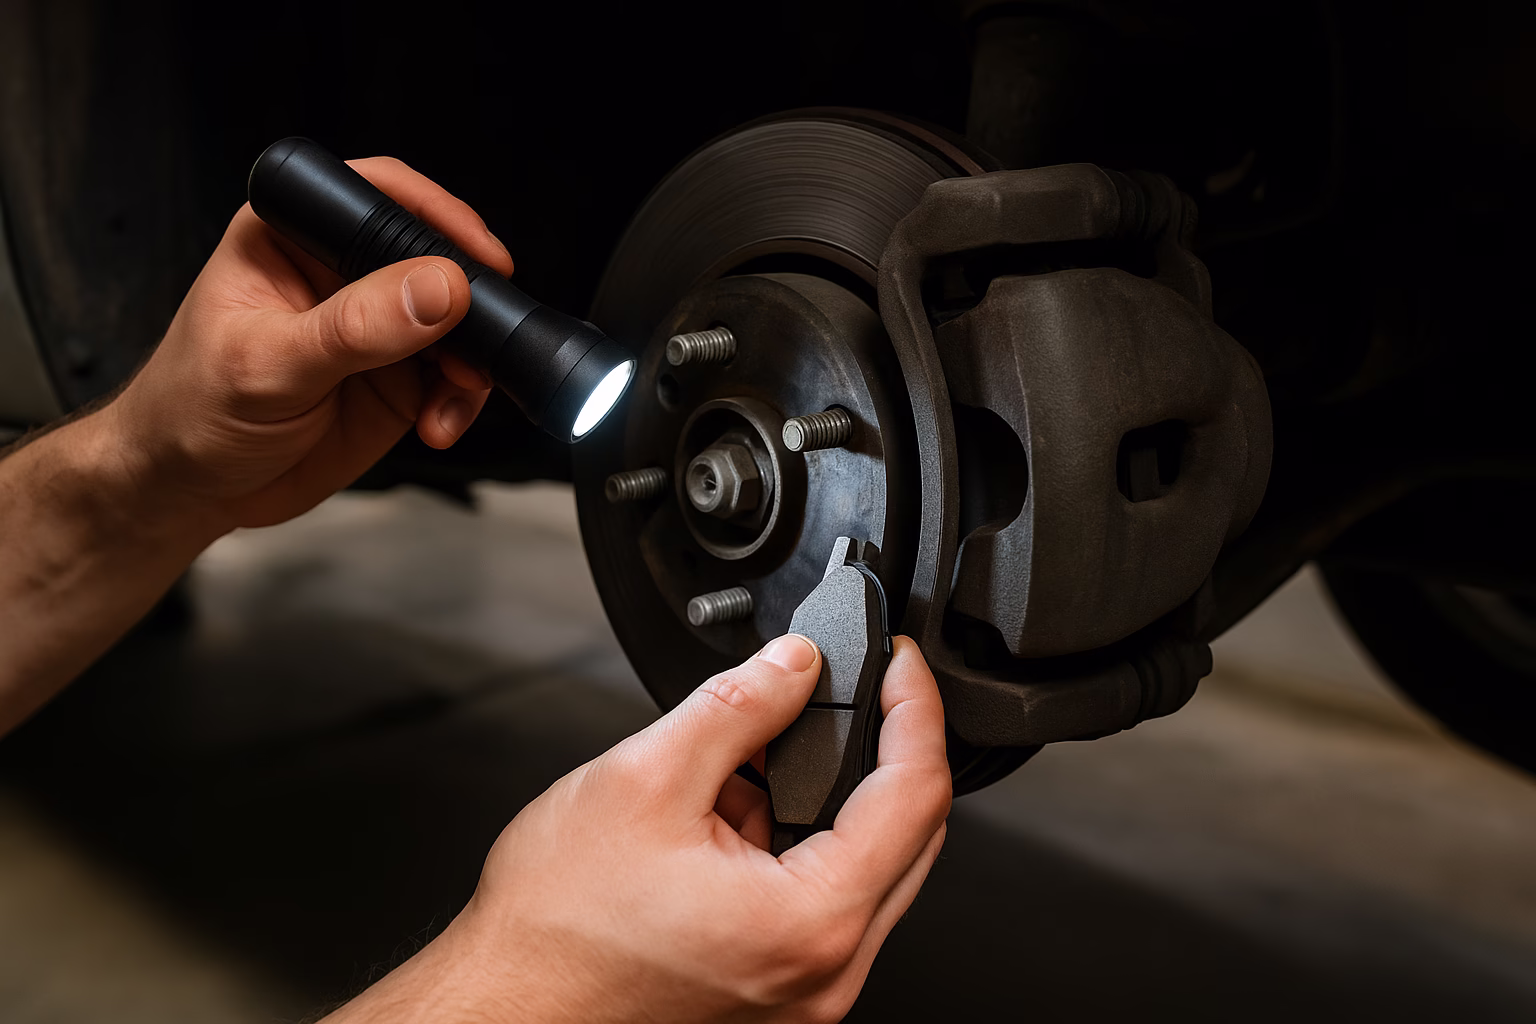
The simplest way to start learning how to check brake pads is with a visual inspection. Many modern wheels have open spokes that let you see the outer edge of the brake pads without removing anything. Shine a flashlight through the wheel opening and look for the friction material—the part that presses against the rotor. If you can see at least 4–5 millimeters of pad thickness, the brakes are generally in safe condition. Anything thinner means it’s time to plan a replacement.
During this process, it’s not only about thickness. Pay attention to the color and texture of the pads. If the surface looks glazed, cracked, or uneven, braking performance may be compromised. Another sign to watch for is whether one pad appears more worn than the other. Uneven wear may indicate a sticking caliper or improper alignment, both of which deserve professional inspection. Noting these details ensures your knowledge of how to check brake pads goes beyond a quick glance.
Brake pad wear indicators are another feature you should recognize. These are small metal tabs designed to scrape against the rotor when the pads get too thin, producing a squealing sound. If you see these tabs touching the rotor, you’ve confirmed that replacement is due. In some vehicles, electronic wear sensors trigger a dashboard warning light. Checking for both physical and electronic indicators adds confidence to your inspection routine.
Learning how to check brake pads visually also includes inspecting the rotor surface. If the rotor shows deep grooves, rust, or scoring, it’s possible the pads are already worn past their safe limit. In that case, replacement of both pads and rotors may be necessary. For added clarity, you can review detailed diagrams on HowStuffWorks, which explains brake pad anatomy. By combining these tips, you’ll develop a reliable routine that ensures every inspection is thorough and effective.
How to Check Brake Pads: Measure Thickness & Wear Indicators
Once you’ve completed the initial glance, the next step in learning how to check brake pads is measuring their thickness. This task gives you precise data instead of a guess. If you’re comfortable removing the wheel, place your vehicle securely on jack stands and remove the lug nuts. With the wheel off, you’ll have a clear look at the entire brake assembly. The pad friction material should measure at least 6–7 millimeters when new. Anything below 3 millimeters means it’s time for replacement. Measuring helps you confirm exactly how much life remains, making it one of the most reliable ways to check brake pads.
Several tools make this process easier. A simple steel ruler or caliper gauge can measure the visible pad surface. Dedicated brake pad thickness gauges are available at auto parts stores and slide easily into the space between the pad and rotor. By documenting the numbers, you’ll track wear over time and anticipate when service will be needed. Remember, knowing how to check brake pads involves both observation and consistent measurement.
Beyond thickness, look for wear indicators. Many pads come with built-in metal tabs that produce a high-pitched squeal when the pad material gets too low. Some modern cars use electronic sensors connected to the dashboard. If you notice the indicator tab close to the rotor, or a warning light on the dash, these are strong signs your pads are nearing the end of their life. Recognizing these features is crucial when you practice how to check brake pads.
Uneven measurements across the inner and outer pads could suggest caliper issues. If the inside pad is much thinner, the caliper piston may not be retracting properly. Identifying this early prevents rotor damage and costly repairs. You can learn more about brake system standards through the International Organization for Standardization. Armed with measurement skills and awareness of wear indicators, you’ll be confident in your ability to check brake pads accurately and responsibly.
How to Check Brake Pads: Road Test Checks
After a garage inspection, another way to master how to check brake pads is through a controlled road test. This step helps you identify performance symptoms that may not be visible to the eye. Start by choosing a quiet, safe road where you can test braking at moderate speeds. As you press the brake pedal, notice its feel. A firm, consistent pedal usually means the pads and hydraulic system are working well. A spongy or soft pedal can signal worn pads, air in the brake lines, or fluid issues.
Listen closely while braking. One of the clearest clues when learning how to check brake pads is unusual noise. A high-pitched squeal often comes from the wear indicator tab contacting the rotor. Grinding noises, on the other hand, suggest the pads have worn completely and metal is scraping metal—a condition requiring immediate replacement. These auditory signs complement your earlier visual checks.
Vibration is another important factor. If the steering wheel shakes or the brake pedal pulses when braking, it may indicate uneven pad wear or warped rotors. This doesn’t always mean your pads are gone, but it’s part of the process when evaluating how to check brake pads. Consistency is key—perform the same test every few months to establish a baseline for your vehicle’s braking behavior.
Finally, monitor stopping distance. If it feels like you need more space than before, your pads may be thin or contaminated. Keep in mind that weather and load also affect braking performance, so compare results under similar conditions. For an in-depth discussion of braking dynamics, the Fédération Internationale de l’Automobile offers technical resources. By combining your garage inspection with a simple road test, you’ll gain the full picture of brake health and learn how to check brake pads in real-world conditions.
How to Check Brake Pads: Step-by-Step Guide
Learning how to check brake pads becomes much easier when you follow a structured approach. Below is a detailed step-by-step guide covering three stages: preparation, inspection, and evaluation. Each stage helps you build confidence and ensures that you don’t overlook important details during the process.
Step 1: Prepare Your Vehicle and Tools
Begin by parking your vehicle on a flat, level surface. Engage the parking brake and place wheel chocks behind the tires for safety. Gather the essentials: flashlight, gloves, safety glasses, and if you plan to remove the wheels, a jack and jack stands. This preparation step sets the foundation for how to check brake pads safely. Take your time ensuring stability—rushing here is one of the most common mistakes new DIYers make.
With tools ready, loosen the lug nuts slightly if you’ll remove the wheel later. Even if you don’t plan to lift the car, preparation gives you flexibility. Reviewing your owner’s manual for torque specs and jack points is recommended. Document your setup with a quick photo to help remember placement the next time you check. This first step reinforces that learning how to check brake pads is as much about safety as it is about mechanics.
Step 2: Perform the Visual and Thickness Check
Shine your flashlight through the wheel spokes to see the outer pad. Estimate thickness visually—look for at least 4 millimeters of friction material. For greater accuracy, remove the wheel and measure with a ruler or brake pad gauge. Record your findings for future comparison. While inspecting, look for wear indicators, uneven pad surfaces, or contamination like oil or brake fluid. Identifying these early helps prevent more serious problems later. This step is the heart of how to check brake pads because it gives you measurable data to base decisions on.
Don’t ignore the rotor surface. If you see grooves, rust, or warping, it may indicate the pads have already reached unsafe wear levels. Compare both inner and outer pads; uneven wear signals a potential caliper issue. Photograph your findings so you can monitor changes over time.
Step 3: Test Drive and Evaluate Performance
Once you’ve completed the physical inspection, take your car for a short drive. Choose a safe, open area to brake from 20–30 mph. Pay attention to pedal feel, stopping distance, and any unusual noises. A squeal often means the wear indicator is contacting the rotor. Grinding is a clear sign pads are completely worn. Pulsation in the pedal may indicate warped rotors, but it also reinforces why knowing how to check brake pads regularly is crucial. Document these observations just as you did with thickness measurements.
At the end of the test, compare your findings to the manufacturer’s recommendations. If thickness is below 3 millimeters or performance feels compromised, plan for replacement. If results look good, schedule your next check in 3–6 months. This structured method ensures that learning how to check brake pads is not a one-time skill but part of an ongoing maintenance routine.
How to Check Brake Pads: Common Mistakes
When drivers first learn how to check brake pads, they often make small mistakes that lead to false conclusions or unsafe results. One of the most frequent errors is rushing the process. Skipping steps like setting the parking brake or using wheel chocks may not seem serious, but it risks both your safety and the accuracy of your inspection. Always take a few extra minutes to prepare the vehicle correctly before beginning.
Another common mistake is relying only on sound. Many assume squealing automatically means pads are worn out. While squeaks often come from wear indicators, they can also be caused by dust or minor vibration. On the flip side, silence doesn’t guarantee that pads are healthy. That’s why mastering how to check brake pads requires combining visual, measurable, and audible signs for a complete picture.
Improper measurement is another pitfall. Some DIYers measure the metal backing plate instead of the actual friction material, leading to an inaccurate reading. Always measure only the pad material itself, not the full assembly. Likewise, forgetting to compare inner and outer pads is a frequent oversight. Uneven wear between the two can indicate caliper or hardware problems, which might not be obvious at first glance.
Some people also misinterpret rotor condition. Seeing a little surface rust after rain is normal and doesn’t always mean replacement. However, deep grooves, cracks, or heavy scoring are signs of trouble. Learning how to check brake pads means recognizing when the pad issue extends to the rotor, making replacement of both necessary.
Finally, overlooking documentation can create long-term problems. If you don’t note the thickness or condition each time, you lose the ability to compare wear rates. A quick photo or written record helps predict when service will be needed. By avoiding these mistakes, your approach to how to check brake pads becomes more accurate, reliable, and safe.
How to Check Brake Pads: When to Replace
Understanding how to check brake pads is only half the job—knowing when to replace them is just as important. Brake pads are consumable components, and ignoring their wear can compromise your entire braking system. A general rule is that if the pad material is 3 millimeters or less, replacement is necessary. Many manufacturers recommend checking every 12,000 miles, but your driving habits and conditions play a big role in wear rates. Stop-and-go city traffic wears pads much faster than steady highway driving.
Another clear signal is the wear indicator tab. If you hear a persistent squeal while driving—even without pressing the brake—it’s a sign that the indicator is contacting the rotor. This is the pad’s built-in alert system to let you know replacement is due. Grinding noises, however, indicate you’ve waited too long. At this point, the pad material is gone and the metal backing plate is damaging the rotor. Recognizing this outcome emphasizes why learning how to check brake pads early prevents costly repairs.
Visual cues also play a role. If you spot cracks, glazing, or contamination on the pads, replacement should be scheduled immediately. Uneven wear patterns between the inner and outer pads may mean the caliper is sticking. In that case, replacing only the pads won’t solve the issue—you’ll need to address the root cause. Knowing how to check brake pads thoroughly ensures you make the right call on both replacement and system health.
Performance symptoms during a road test are equally important. If you feel longer stopping distances, pedal vibration, or pulling to one side, new pads may be required. For further guidance, many automakers provide detailed service intervals in the owner’s manual. You can also consult trusted resources such as AAA’s Auto Repair Guide for industry recommendations. By combining measurement, sound, appearance, and feel, you’ll develop a complete understanding of when to replace your pads after learning how to check brake pads effectively.
How to Check Brake Pads: FAQ
How often should I check my brake pads?
Experts recommend that drivers learn how to check brake pads at least twice a year or every 12,000 miles. Frequent city driving or heavy braking may require inspections more often. Regular checks help catch early wear before it becomes unsafe.
Do I need to remove the wheels to check brake pads?
No, you can often learn how to check brake pads by looking through the wheel spokes with a flashlight. However, removing the wheels provides the most accurate view and allows you to measure thickness directly.
What is the minimum safe thickness for brake pads?
Most new pads are 10–12 millimeters thick. Once they wear down to 3 millimeters or less, replacement is strongly recommended. Measuring accurately is an essential part of learning how to check brake pads.
Can I drive if my brake pads are squealing?
A squeal usually means the wear indicator is touching the rotor. While you can drive short distances, replacement should be scheduled as soon as possible. Ignoring it can quickly lead to metal-on-metal grinding.
Is it safe for beginners to check brake pads?
Yes, learning how to check brake pads is a safe task when done carefully. The process is mostly visual and observational. Always use safety equipment like gloves, goggles, and jack stands if lifting the vehicle.
How to Check Brake Pads: Conclusion
Mastering how to check brake pads is a skill that improves both safety and confidence. By learning to inspect visually, measure thickness, listen for wear indicators, and perform a road test, you gain a complete picture of brake health. Each method reinforces the others, ensuring you’re not relying on just one sign to make important decisions about your vehicle’s safety. Knowing how to check brake pads turns routine maintenance into a proactive habit rather than waiting for costly problems to surface.
Regular checks also save money. Replacing pads at the right time prevents rotor damage and protects other components of the braking system. As you practice how to check brake pads consistently, you’ll notice patterns in wear that match your driving style and conditions. This knowledge helps you schedule replacements more efficiently, reducing the risk of unexpected repairs or unsafe driving conditions.
It’s also worth noting that brake pad inspection is an accessible skill for nearly every driver. Even beginners can learn how to check brake pads with basic tools and careful observation. For those less comfortable with mechanical work, this knowledge still helps you communicate more effectively with professional mechanics, ensuring you get honest assessments and appropriate service. Understanding the basics empowers you as a car owner.
Ultimately, knowing how to check brake pads isn’t just about prolonging the life of your parts—it’s about ensuring your car stops safely every time. By making inspections part of your maintenance routine, you protect yourself, your passengers, and others on the road. As a final step, consider marking a calendar reminder to repeat the process every few months. With practice and consistency, learning how to check brake pads becomes second nature, making you a more responsible and prepared driver.