
Introduction
Few things can make a car’s interior look worn out faster than a cigarette burn on the ceiling fabric. The headliner is one of the most visible parts of a vehicle’s interior, and even a small hole or dark mark immediately catches the eye. That’s why learning how to fix cigarette burn in headliner is such an important skill for car owners. Whether you’re planning to sell your car, keep it looking fresh, or simply want to erase the reminder of a past mistake, repairing a burn in the headliner is not only possible but also affordable if you use the right techniques.
Many people assume that once the fabric is damaged by fire, the only option is to replace the entire headliner. In reality, this can be a costly repair that often isn’t necessary for minor damage. Instead, knowing how to fix cigarette burn in headliner gives you the option to restore your car’s appearance with simple materials like adhesive, filler, and fabric patches. These methods not only save you money but also extend the life of your existing upholstery. For small burns, a repair can often make the flaw nearly invisible, leaving your interior looking neat and well-maintained.
Beyond the appearance, fixing cigarette burns also impacts the resale value of your vehicle. Potential buyers see visible damage as a sign of neglect, even if the car runs perfectly. A burn mark on the headliner may lead to lower offers or lost sales opportunities. By taking the time to fix cigarette burn in headliner, you’re protecting your investment and making sure your car leaves a better impression on anyone who rides in it. Even if you aren’t planning to sell, a clean, well-kept interior improves your driving experience and comfort.
In this guide, we’ll walk you through everything you need to know: why it’s worth repairing burns, the common mistakes to avoid, and a detailed step-by-step process to restore your headliner. We’ll also answer common questions and give you tips for preventing future damage. By the end, you’ll feel confident in your ability to fix cigarette burn in headliner without paying for costly replacements.
Why Fixing Cigarette Burns in Headliners Matters
At first glance, a small hole in your car’s interior roof may not seem like a big deal, but learning how to fix cigarette burn in headliner has far-reaching benefits. A headliner is more than just fabric glued to the ceiling—it’s a crucial part of the overall appearance and comfort of your vehicle. Even a tiny burn mark stands out against the smooth material, drawing attention every time you or a passenger look up. Over time, that small imperfection can make your entire interior feel neglected or poorly maintained, even if the rest of the car is in great shape.
One of the main reasons to fix cigarette burn in headliner is to maintain your car’s value. When selling or trading in a vehicle, dealerships and buyers look for signs of damage. Upholstery flaws are particularly noticeable because they suggest careless ownership. Even if your car runs flawlessly, a cigarette burn can reduce its resale value by hundreds of dollars. Fixing the problem early keeps your car looking newer for longer and helps you avoid costly deductions during valuation.
Aesthetic appeal is another important factor. A car’s interior is where you spend most of your time, and a burn hole directly above your head is both distracting and frustrating. Learning how to fix cigarette burn in headliner allows you to restore a seamless look to the cabin, giving you a greater sense of pride and satisfaction when driving. Passengers also notice details, and a repaired headliner creates a much more welcoming and professional impression.
Finally, there’s a psychological benefit. A cigarette burn may remind you of an accident or a bad habit you’ve worked hard to leave behind. Fixing it can feel like a fresh start, giving you peace of mind every time you get into your car. Small repairs like this reinforce the idea that your vehicle is worth caring for, encouraging better upkeep in the long run. Whether for financial, practical, or personal reasons, understanding why to fix cigarette burn in headliner makes it clear that taking action is always worthwhile.
Common Mistakes People Make When Fixing Cigarette Burns in Headliners
When trying to fix cigarette burn in headliner, many people rush the job or use the wrong materials, which often makes the damage worse instead of better. One of the most common mistakes is attempting to scrub or sand away the damaged spot. Unlike stains, a cigarette burn removes material, and aggressive scrubbing only enlarges the hole or frays the fabric further. Once fibers are broken down, they cannot be restored, so it’s always better to work gently and focus on repairing rather than removing more of the headliner.
Another frequent error occurs when people try to patch the hole with mismatched fabric. Grabbing any piece of cloth that looks close in color might seem like a quick solution, but the difference in texture and shade usually makes the repair more obvious. To properly fix cigarette burn in headliner, you should use a small patch of matching headliner material, which can often be sourced from hidden areas of the car (like under trim pieces) or purchased in small swatches. Using the right material ensures the repair blends in naturally.
A third mistake involves using the wrong adhesive. Household glues, superglue, or craft adhesives may not hold up under the heat inside a car, especially during summer. These products can also harden and leave visible marks around the repair. For a lasting fix, always use upholstery adhesive or fabric-safe glue that is flexible and heat-resistant. This small detail is essential when you want to fix cigarette burn in headliner effectively and ensure the repair stays intact over time.
Finally, impatience often ruins otherwise good repairs. People apply too much filler at once, rush the drying process, or fail to blend the area with surrounding fabric. Taking time to let adhesives set, carefully trimming frayed edges, and gently pressing patches into place makes all the difference in how seamless the repair looks. Skipping these steps may leave a lumpy or uneven finish, drawing even more attention to the burn mark. By avoiding these common mistakes, you’ll be far better prepared to successfully fix cigarette burn in headliner without wasting time or money.
Step-by-Step Guide: How to Fix Cigarette Burn in Headliner
Step 1: Assess the Damage and Prepare the Area
The first step to successfully fix cigarette burn in headliner is carefully assessing the size and depth of the damage. Not all burns are the same—some only affect the outer fabric layer, while others go deeper and damage the foam or adhesive beneath. Start by gently examining the area with your fingers to see whether the burn is just a surface blemish or a deeper hole. This assessment is important because it determines which repair method will be most effective. Small surface burns can often be filled and disguised, while larger holes may require patching.
Once you know the extent of the damage, preparation is key. Begin by cleaning the surrounding area with a soft cloth and a mild upholstery cleaner. Dirt, oils, and debris around the burn can prevent adhesives or fillers from bonding properly. Avoid soaking the fabric, as too much moisture weakens the headliner’s glue and may cause sagging. A light wipe is enough to create a clean surface for repair. Next, trim away any loose or frayed fibers around the edges of the burn with a small pair of scissors. Be careful not to enlarge the hole—just remove excess strands that make the damage stand out more.
Preparation also involves gathering the right tools. You’ll typically need a fabric-safe adhesive, a small amount of filler (such as upholstery foam or fabric repair compound), and a piece of matching headliner fabric for patching if necessary. Having all materials ready ensures you can work smoothly without interruption. Many beginners make the mistake of rushing into repairs without preparation, which often results in uneven patches or adhesives setting too quickly. By taking the time to properly assess and prep, you’re setting yourself up for a clean and professional-looking repair.
Taking this careful approach at the start makes the rest of the process easier. When you fix cigarette burn in headliner, attention to detail during preparation ensures that fillers blend better, patches adhere properly, and the repair looks seamless once complete. Think of this step as laying the foundation—without it, even the best materials won’t produce the result you’re hoping for.
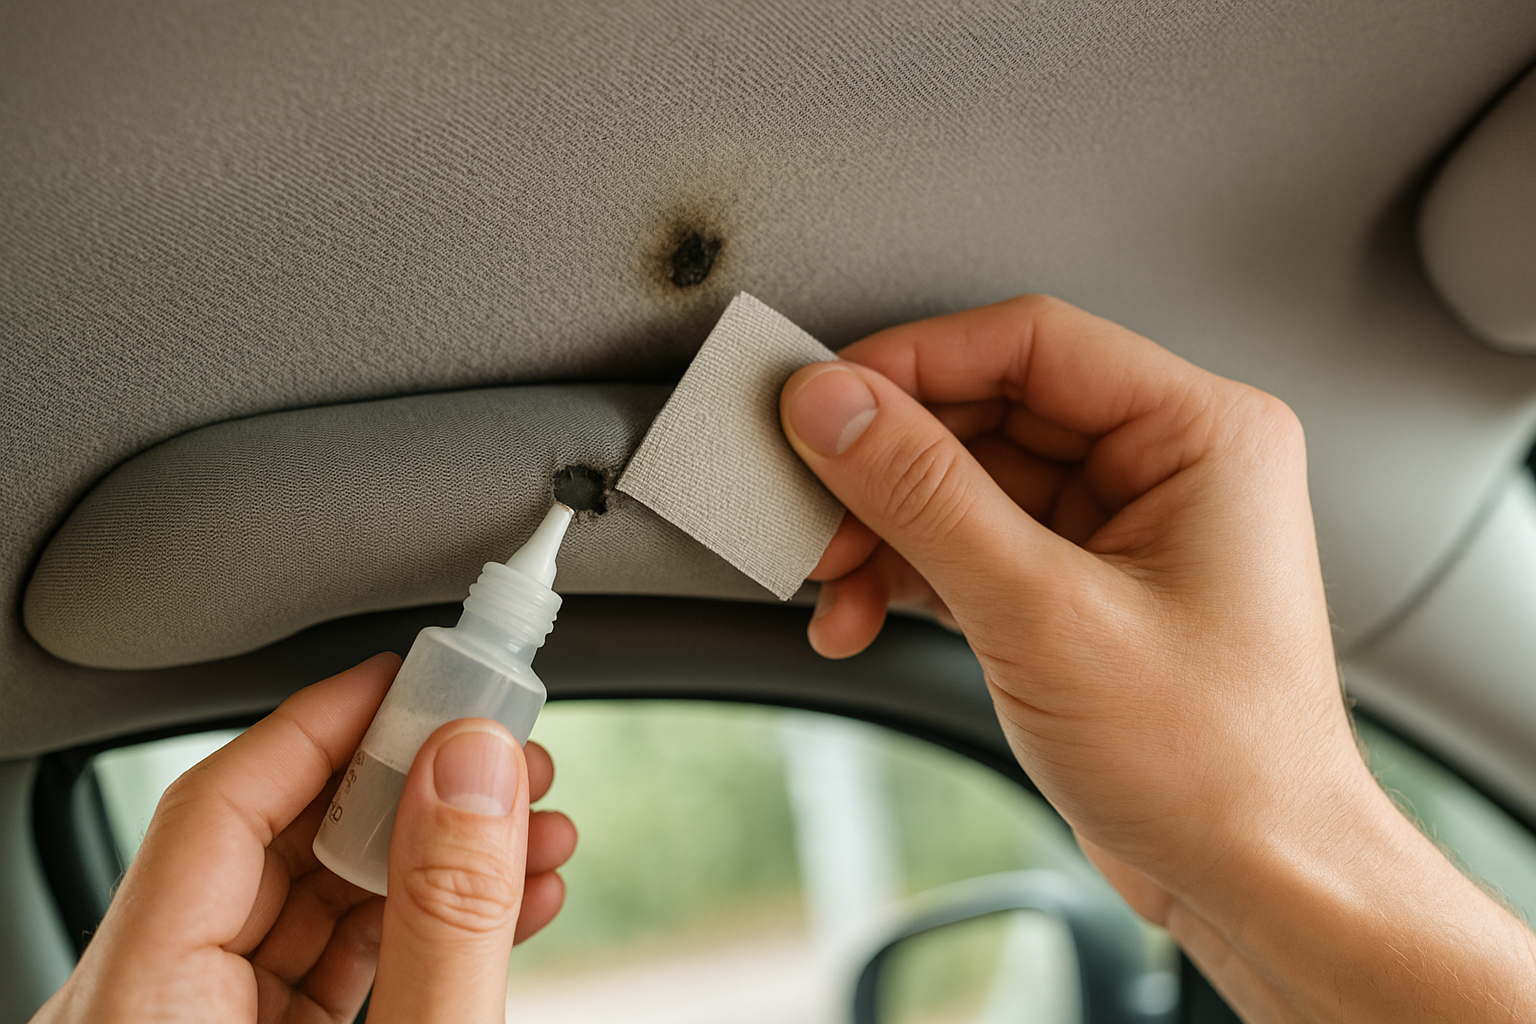
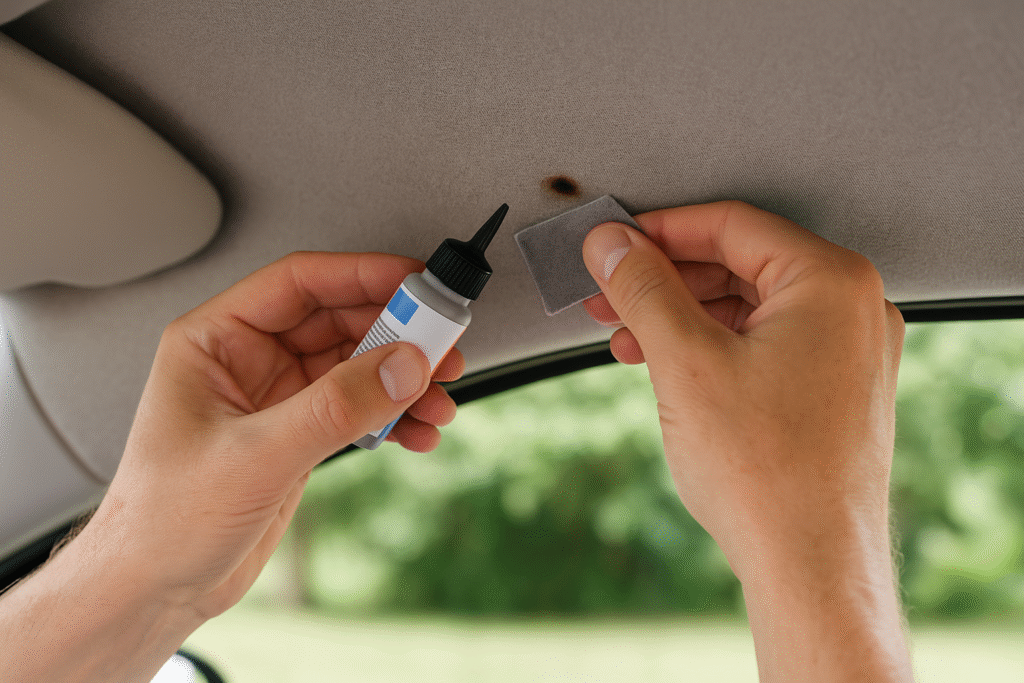
Step 2: Apply Repair Materials
After preparation, the next step to fix cigarette burn in headliner is applying the right repair materials to restore the damaged area. The approach depends on the severity of the burn. For very small surface burns, a filler compound or a fabric repair kit may be all that’s needed. These kits often include colored adhesives or compounds designed to mimic fabric texture. Apply a small amount directly into the hole and smooth it gently with a spatula or plastic tool. Once it dries, lightly dab matching fabric fibers (from a kit or collected from a hidden area of the headliner) into the adhesive to create a seamless look. This method is ideal for burns smaller than a pencil eraser.
For larger burns, patching is the best option. Cut a small piece of matching headliner fabric slightly larger than the damaged area. Apply a thin, even layer of upholstery adhesive around the edges of the burn and carefully press the patch into place. To blend the repair, gently press the fabric so it lies flush with the surrounding material. Use a clean, dry cloth to smooth it out, ensuring there are no visible ridges or glue marks. This technique is the most reliable way to fix cigarette burn in headliner when the damage is too large for filler alone.
Another option is the use of aerosol upholstery adhesive combined with loose fibers. Spray a light mist of adhesive into the damaged spot, then sprinkle fibers onto it, pressing gently until the surface looks uniform. This trick works especially well when fibers are collected from hidden edges of the headliner, such as under a trim panel. By using the same fabric, the color and texture match perfectly, making the repair nearly invisible. Patience is essential here—apply adhesive sparingly and allow drying time between layers if needed.
Regardless of which method you choose, the goal is to rebuild the surface so the burn disappears into the surrounding fabric. Rushing this step or using too much adhesive can cause lumps, shiny spots, or mismatched colors. By carefully applying filler, patches, or fibers, you can fix cigarette burn in headliner in a way that blends seamlessly with the rest of the interior, leaving the repair undetectable to passengers and buyers alike.
Step 3: Blend and Finish the Repair
The final stage to fix cigarette burn in headliner is blending and finishing the repair so that the patch or filler looks as natural as possible. Even if you’ve filled or patched the burn correctly, the repair may still stand out slightly due to differences in texture, sheen, or color. Proper finishing ensures the damaged spot fades into the surrounding fabric, making the repair nearly invisible to anyone who glances at the car’s interior. This stage requires patience and attention to detail, but it is what separates a passable fix from a professional-looking restoration.
Start by gently brushing the repaired area with a soft-bristled brush or microfiber cloth. This helps lift fibers, distribute adhesive, and blend the texture with the rest of the headliner. If you used fibers from a repair kit, brushing ensures they settle naturally into place rather than clumping together. Next, evaluate the color match. If the repair still looks lighter or darker than the surrounding fabric, use a small amount of matching fabric dye or a color pen from a repair kit to even it out. Apply carefully and sparingly—too much dye can create dark blotches that draw attention to the spot you’re trying to disguise.
For larger patches, blending the edges is critical. Lightly press along the seam of the patch with a cloth to make sure it adheres evenly. In some cases, a light mist of upholstery-safe spray adhesive around the edges can smooth transitions and prevent lifting over time. Another tip when you fix cigarette burn in headliner is to step back and look at the repair from different angles and lighting conditions. Car interiors often look different in bright daylight versus dim evening light, and checking in multiple conditions helps you identify whether further blending is needed.
Once satisfied, allow the repair to fully cure. Adhesives and fillers need time to set properly—usually several hours—before being exposed to heat, vibration, or cleaning. Rushing this stage can undo your work. After curing, give the entire headliner a gentle vacuum or wipe-down to freshen its appearance and make the repair area less obvious. When done correctly, this finishing process ensures that your attempt to fix cigarette burn in headliner doesn’t just cover damage but restores the seamless look of your car’s interior, preserving both comfort and value.
FAQs About Fixing Cigarette Burns in Headliners
Can a cigarette burn in a headliner be completely invisible after repair?
A common question when you try to fix cigarette burn in headliner is whether the repair can make the damage completely disappear. The answer depends on the size and severity of the burn. Small surface burns can often be disguised so well with filler compounds, fabric fibers, or patches that they become nearly invisible, especially to someone who doesn’t know where to look. Larger burns, however, may still leave a faint mark or texture difference even after careful repair. The goal of most DIY methods is not always perfect invisibility but reducing the visibility of the damage so it no longer distracts or lowers your car’s value.
What tools and materials do I need to fix a cigarette burn in a headliner?
To successfully fix cigarette burn in headliner, you’ll need a few basic tools and supplies. A fabric-safe adhesive or upholstery glue is essential, along with filler compounds or a repair kit if the burn is small. For larger burns, you’ll need a small patch of matching fabric. Scissors for trimming frayed edges, a spatula for smoothing filler, and a soft-bristled brush for blending fibers are also helpful. Many auto supply stores sell upholstery repair kits that contain everything you need. Having the right materials on hand ensures the repair is smooth, durable, and blends seamlessly with the surrounding fabric.
Is it better to DIY a headliner burn repair or hire a professional?
Deciding whether to fix cigarette burn in headliner yourself or pay a professional depends on your confidence and the size of the damage. DIY methods work very well for small burns and cost only a fraction of professional repairs. With patience and attention to detail, you can achieve results that look professional. However, if the burn is large, located in a highly visible area, or if the headliner fabric is rare or textured, hiring a professional may be the safer choice. Professionals can replace larger sections of fabric and ensure a perfect match, though the cost will be significantly higher.
How much does it cost to fix a cigarette burn in a headliner?
The cost to fix cigarette burn in headliner varies depending on the method. DIY repair kits typically cost between $15 and $40 and are sufficient for small burns. Patching with fabric may cost slightly more if you need to purchase material, but it is still budget-friendly. Professional repairs, on the other hand, can range from $100 to $300 depending on the extent of the damage and whether the entire headliner needs to be replaced. For most car owners, starting with DIY is the most affordable and practical solution before considering professional options.
How can I prevent future cigarette burns in my car’s headliner?
Prevention is always better than repair when it comes to car interiors. The easiest way to avoid needing to fix cigarette burn in headliner is to avoid smoking in the car altogether. If that’s not possible, always use an ashtray and keep windows slightly open to prevent ashes from flying upward. Seat covers and interior protectors can also reduce the risk of burns spreading to the headliner. Educating passengers and being cautious when handling cigarettes inside the vehicle can save you time and money in the long run. By taking these preventive measures, you can keep your headliner clean and damage-free for years.
Conclusion
Learning how to fix cigarette burn in headliner gives car owners an affordable and effective way to restore their vehicle’s interior without costly replacements. Even though burns caused by cigarettes may look permanent, with the right preparation, tools, and patience, you can repair them in a way that blends seamlessly into the fabric. Small burns can be filled and disguised, while larger ones can be patched using matching materials. The result is a headliner that looks clean, professional, and far more appealing to both passengers and potential buyers.
The benefits go beyond aesthetics. Repairing cigarette burns helps protect your car’s resale value, since visible damage often leads to reduced offers during trade-ins or private sales. It also improves your daily driving experience by removing unsightly blemishes that draw attention every time you enter the vehicle. When you take the time to fix cigarette burn in headliner, you’re not just improving the look—you’re also demonstrating care and attention to detail, which extends the life of your car’s interior overall.

Another reason to take this repair seriously is peace of mind. Fixing damage left by smoking helps create a fresh start, especially for drivers who no longer smoke or who want to remove reminders of past habits. It’s also a great way to impress passengers with a neat, well-kept interior. With DIY methods and low-cost repair kits, anyone can learn how to fix cigarette burn in headliner without specialized training.
📌 Read Similar Topics
- Fix Burn Hole on Couch
- How to Fix a Tear in Leather Shoes
- Unsticking a Zipper
- Marble Scratch Repair
- Door Latch Not Fully Retracting
For more professional advice and background reading, check these reliable resources:
Family Handyman Car Upholstery Repair,
Wikipedia on Headliner Fabric, and
YourMechanic Guide to Car Upholstery Maintenance.
In summary, repairing burns may seem challenging at first, but with the right steps, you can easily fix cigarette burn in headliner at home. This practical DIY solution saves money, maintains your car’s value, and keeps the interior looking polished for years to come.


Pingback: How To Remove A Screw Without A Screwdriver Smartly And Easily