
Introduction: Why Marble Scratch Repair Matters
Marble has long been prized as one of the most luxurious natural stones, used in countertops, flooring, and decorative accents. Its smooth, glossy surface brings elegance to any space, but it also comes with a vulnerability—scratches. Even with regular care, heavy kitchen use, dragging furniture, or accidental contact with sharp objects can cause blemishes. This is why understanding marble scratch repair is so important. It’s not just about restoring beauty, but also about protecting the longevity of the stone.
When scratches are left untreated, they can worsen over time, trapping dirt and moisture that dull the finish. This not only spoils the appearance but also makes cleaning harder. Fortunately, many cases of marble scratch repair don’t require hiring a professional. With the right tools and a little patience, homeowners can often polish out small blemishes themselves. For deeper scratches, there are step-by-step methods and specialized products that help restore marble’s shine while minimizing further damage.
The good news is that marble is more resilient than it seems. By learning how to perform marble scratch repair properly, you can save money on costly professional services and extend the lifespan of your stone surfaces. In this guide, we’ll cover everything from preparation and repair techniques to common mistakes and expert tips, so you’ll have all the knowledge needed to bring back the smooth, polished finish that makes marble timeless.
What You’ll Need Before You Start
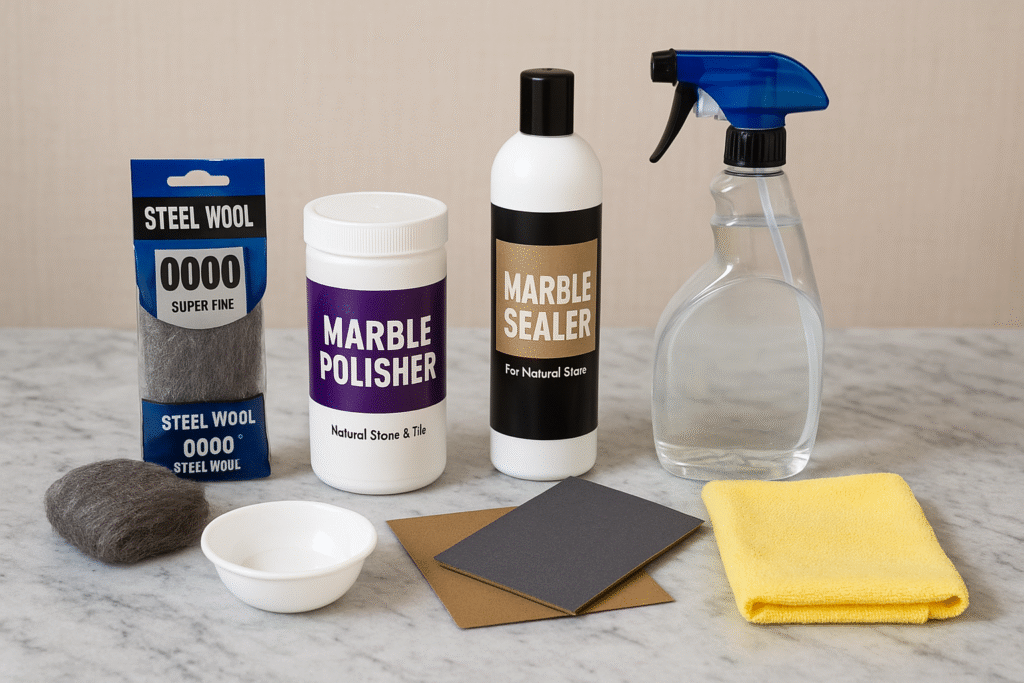
Before beginning any marble scratch repair, it’s important to gather the right tools and materials to ensure the process goes smoothly. Marble is softer than many other natural stones, which makes it more prone to scratches but also easier to restore with the right approach. Having everything ready before you start prevents unnecessary interruptions and helps you avoid mistakes.
The first item you’ll need is a clean, lint-free microfiber cloth. This will be used both for cleaning the surface before you begin and for applying polishing compounds later. A pH-neutral marble cleaner is also essential. Never use acidic cleaners like vinegar or lemon juice, as these will etch the marble and make the scratches worse. If a marble-specific cleaner isn’t available, a mild soap solution can work in a pinch.
Next, you’ll want to have fine-grade sandpaper (starting from 800 grit and up to 1500 or 2000 grit) or very fine steel wool (0000 grade). These materials are gentle enough for marble scratch repair without causing new damage when used correctly. For deeper scratches, having a variable-speed polisher or buffer can make the process easier and more effective, but for small jobs, hand polishing is usually sufficient.
Another key product is marble polishing powder or paste, which restores the stone’s natural shine after the scratch has been buffed out. Make sure you choose a formula specifically designed for marble, not for granite or quartz, since each stone requires different abrasives and compounds. Along with this, keep a spray bottle filled with clean water nearby. Moisture is crucial when sanding or buffing marble to prevent overheating and protect the surface.
Safety should never be overlooked. Wear protective gloves to avoid skin irritation from the compounds and to ensure a firm grip when handling tools. If you’re working on a floor, use knee pads for comfort. Adequate lighting is also essential—you’ll need to clearly see the scratches and monitor progress throughout the repair process. By preparing all these items in advance, you’ll set yourself up for success in marble scratch repair.
Step 1: Clean and Inspect the Surface
The first and most critical stage in marble scratch repair is cleaning and inspecting the surface properly. Skipping or rushing this step often leads to poor results because dirt, dust, and oils can interfere with sanding or polishing. Before you even think about applying compounds or using sandpaper, take the time to prepare the marble so you can see the scratch clearly and work on it without introducing new problems.
Begin by removing any objects from the area, such as appliances, vases, or furniture, so the entire marble surface is accessible. Next, wipe the surface gently with a dry microfiber cloth to pick up loose debris. Once that’s done, spray the marble with a pH-neutral cleaner designed for stone care. Never use harsh chemicals, bleach, or acidic substances such as vinegar or lemon juice, because these will etch the marble and make the scratch more noticeable. If a specialty cleaner isn’t available, mix a few drops of mild dish soap with warm water in a spray bottle as a temporary alternative.
After spraying the area, wipe it with a damp microfiber cloth using light circular motions. This not only removes dirt but also helps highlight the scratch against the now-clean background. For stubborn grime, repeat the process until the surface looks spotless. Pay special attention to corners and edges where dirt tends to accumulate, as this buildup can disguise scratches or interfere with repair work.
Once the marble is clean, inspect the scratch closely under bright lighting. Use a flashlight or lamp if necessary. Move your head from different angles to check how deep the scratch runs. Light surface scratches often appear faint and may only affect the sealant or polish layer, while deeper scratches will look like grooves that cut into the actual stone. This inspection helps you decide whether polishing alone will suffice or whether sanding and more advanced marble scratch repair techniques are needed.
During inspection, you should also check for other imperfections near the scratch, such as etching, chips, or dull spots. Repairing these at the same time ensures a uniform finish once the polishing is complete. By thoroughly cleaning and carefully inspecting the surface, you set the stage for a successful marble scratch repair that restores shine and prevents further damage.
Step 2: Buff or Sand the Scratch
Once the surface is properly cleaned and inspected, the next stage of marble scratch repair is buffing or sanding the scratch. The choice between buffing and sanding depends on the depth of the damage. Light surface scratches often disappear with gentle polishing, while medium to deep scratches may require sanding before polishing can restore the stone’s natural shine. This step requires patience, the correct tools, and careful technique to ensure the marble is improved rather than further damaged.
If the scratch is light, begin with a marble polishing compound or powder. Dampen a clean microfiber cloth or a soft pad with water, sprinkle a small amount of the powder onto the surface, and rub in circular motions. Keep the area moist as you polish, since water acts as both a lubricant and a coolant. This prevents heat from building up and protects the marble from micro-cracking. For small areas, hand polishing is usually sufficient, but for larger countertops or flooring, you may use a variable-speed polisher at its lowest setting. The goal is to gently blend the scratched area into the surrounding surface so the mark fades away.
For deeper scratches, sanding may be necessary. Use fine-grit sandpaper, typically starting with 800 or 1000 grit and progressing up to 2000 grit. Wrap the sandpaper around a sanding block for even pressure, and lightly sand over the scratch in circular motions. Always keep the surface damp by spraying water regularly. This not only prevents overheating but also helps the sandpaper glide smoothly across the marble. Avoid pressing too hard—gentle, consistent pressure is more effective and less risky. As you sand, periodically wipe the surface with a microfiber cloth to check progress. The scratch should gradually become less visible as the surface smooths out.
If you’re using steel wool (0000 grade), the process is similar. Lightly buff the scratch with circular motions while keeping the area moist. Steel wool is effective for faint scratches but should be used sparingly, as it may dull the surrounding finish if over-applied. After sanding or buffing, rinse the area with clean water and dry it thoroughly to remove any abrasive particles.
This stage of marble scratch repair is often where the most noticeable improvements occur. By carefully buffing or sanding, you reduce the scratch to a level where final polishing and sealing can restore the marble’s glossy, uniform appearance.
Step 3: Polish and Seal
After buffing or sanding the affected area, the last stage of marble scratch repair is polishing and sealing. This step not only restores the glossy shine that marble is known for but also provides a protective layer against future scratches, stains, and etching. Skipping this stage often leaves the surface looking dull or uneven, even if the scratch itself has been removed, so it is essential for achieving professional-quality results.
Begin by applying a marble polishing powder or compound to the repaired area. Sprinkle a small amount directly onto the surface and add a few drops of water to create a paste-like consistency. Using a microfiber cloth or a soft buffing pad, rub the compound in circular motions across the entire area. If you’re working on a large surface such as a countertop or floor, a variable-speed polisher can save time and produce a more uniform finish. Keep the polisher set to its lowest speed and make sure the surface remains damp to avoid friction burns or haze marks on the marble.
Continue polishing until the repaired area blends seamlessly with the surrounding surface. You’ll notice the marble gradually regaining its original luster. Once satisfied, wipe away any excess compound with a clean damp cloth and allow the area to dry completely. At this point, the scratch should be far less visible or completely gone, depending on its original depth. This process of marble scratch repair works best on light to medium scratches, though even deeper marks can often be improved significantly.
The final step is sealing. Marble is a porous stone, and without a protective seal, it is more likely to absorb moisture, oils, and other substances that lead to etching or further scratches. Apply a marble sealer according to the manufacturer’s instructions, usually by spreading it evenly across the surface and allowing it to penetrate for a few minutes before buffing off the excess. Sealers enhance durability and add an extra layer of shine, ensuring that your hard work in marble scratch repair lasts longer.
Once sealed, allow the marble to cure for the recommended time before using it again. Regular reapplication of sealer—typically every 6 to 12 months—will keep the stone resilient and easier to maintain. With polishing and sealing complete, your marble will not only look revitalized but also stay better protected against everyday wear and tear.
Common Mistakes to Avoid When You Do Marble Scratch Repair
Even though marble scratch repair can often be done at home with basic tools, many homeowners make simple mistakes that either reduce the effectiveness of the repair or actually make the surface worse. Being aware of these pitfalls ahead of time will help you achieve better results and extend the life of your marble surfaces.
One of the most common mistakes is using the wrong type of cleaner. Acidic solutions like vinegar, lemon juice, or store-bought bathroom sprays can cause etching—chemical burns on the marble surface that look similar to scratches but require different treatment. Before starting marble scratch repair, always use a pH-neutral cleaner specifically designed for stone care. This ensures the surface is safe to work on and prevents new damage from forming while you try to remove scratches.
Another mistake is applying too much pressure when sanding or buffing. Marble is a relatively soft stone, so aggressive sanding can create uneven patches or new scratches instead of smoothing the existing one. It’s better to use gentle, consistent motions and keep the surface wet at all times. Patience is key—forcing the process usually does more harm than good.
Skipping the inspection stage is another error. Some scratches may be shallow and require only polishing, while others run deeper and need sanding first. If you don’t inspect carefully under good lighting, you may waste time using the wrong method and still end up with a visible mark. Always clean and examine the marble thoroughly before committing to any repair technique.
Failing to finish with sealing is a frequent oversight. Once you’ve invested time in marble scratch repair, not sealing the stone leaves it vulnerable to new scratches, stains, and moisture damage. Sealing protects the polished surface and ensures the results last longer. Another mistake is using generic sealants not intended for marble—these may leave streaks or reduce the stone’s shine. Always choose a product designed for marble surfaces.
Finally, many people attempt repairs without proper preparation. Not having the right materials on hand, working in poor lighting, or rushing the process often leads to uneven results. Taking the time to prepare tools, clean thoroughly, and follow each step carefully is the difference between an amateur-looking fix and a polished, professional finish.
Alternative Methods for Marble Scratch Repair
While traditional sanding, polishing, and sealing are the most common approaches to marble scratch repair, there are also alternative methods that can help depending on the severity and type of scratch. Knowing these options gives you flexibility and can save time or money when dealing with light blemishes or unique situations.
One alternative method involves using marble polishing creams instead of powders. These creams are often easier for beginners to apply because they spread evenly and require less preparation. Simply apply the cream with a damp cloth, buff in circular motions, and then rinse off. Polishing creams are especially effective for restoring shine to small scratches that don’t penetrate deeply into the stone.
Another approach is the use of epoxy or resin fillers for deeper scratches or chips. If the scratch cuts below the polished layer and leaves a groove, a clear resin can be applied to fill the gap. Once hardened, the surface can be sanded and polished to blend with the surrounding marble. This method is particularly useful for countertops or high-traffic flooring where scratches may be too deep for standard polishing techniques.
For very fine scratches that make marble look dull but aren’t individually visible, diamond polishing pads can be used. These pads come in different grit levels and are attached to a polisher or buffer. By gradually moving from coarse to fine grit, you can restore a glossy, even surface. Diamond pads are more aggressive than traditional sandpaper and should be handled carefully, but they provide excellent results for widespread dullness or multiple scratches.
Some homeowners also turn to professional-grade kits designed for DIY marble scratch repair. These kits typically include polishing compounds, pads, and sealers tailored for marble use. While they may cost more than individual products, they provide a complete solution and are often easier for beginners because the instructions are specific to marble care.
Lastly, when scratches are minimal, simple maintenance can act as a repair method on its own. Regular cleaning with pH-neutral stone cleaner, combined with periodic resealing, can minimize the appearance of light scratches and prevent new ones from forming. Over time, this maintenance routine can keep marble surfaces looking polished without needing frequent intensive repairs.
Exploring these alternative methods allows you to tailor your marble scratch repair approach to the exact condition of your stone. Whether you’re dealing with light scuffs, deep grooves, or widespread dullness, there’s always a suitable method to restore marble’s natural elegance.
Expert Tips and Best Practices
Carrying out marble scratch repair successfully requires more than just following the basic steps—it also benefits from expert insight and best practices that help you avoid mistakes and achieve a long-lasting finish. Professionals who work with natural stone emphasize preparation, patience, and the right choice of products as the keys to restoring marble without compromising its natural beauty.
One of the most important tips is to always test products on an inconspicuous area before applying them to visible surfaces. Different types of marble vary in hardness, porosity, and finish. A compound that works well on one slab might cause dullness on another. By testing in a hidden corner, you minimize the risk of unwanted results while ensuring compatibility with your stone.
Experts also recommend using water generously during sanding or polishing. Keeping the surface damp prevents overheating, reduces friction, and allows abrasives to glide more smoothly. This technique not only protects the marble but also makes the repair more effective. Another best practice is to polish in consistent, overlapping circular motions rather than back-and-forth strokes, which can leave uneven marks.
When applying sealers, follow the manufacturer’s instructions carefully. Applying too much can leave streaks or a sticky residue, while too little may not provide adequate protection. Sealers should be reapplied every 6–12 months depending on usage, especially for high-traffic areas like kitchen countertops and floors. For homeowners looking for detailed scientific insights into stone care, the U.S. Geological Survey guide on stone durability provides excellent background on how natural stone reacts to wear and maintenance.
Another valuable tip is to know when to stop DIY efforts. If scratches are too deep, widespread, or located in highly visible areas, professional restoration may be the best choice. Experts use industrial-grade diamond abrasives and specialized equipment to refinish entire slabs, ensuring a flawless finish that DIY methods can’t always achieve.
Finally, prevention is always better than repair. Use coasters, placemats, and protective pads under heavy objects. Regularly clean marble with a pH-neutral cleaner and avoid dragging items across its surface. By combining preventive care with the right repair techniques, you can minimize damage and extend the life of your marble surfaces. With these expert best practices, marble scratch repair becomes more effective, efficient, and enduring.
Frequently Asked Questions About Marble Scratch Repair
Homeowners often have many questions when it comes to marble scratch repair. While the process may seem intimidating, most concerns are common and easily addressed with the right guidance. Below are some of the most frequently asked questions to help you feel more confident before starting your own repair project.
Can all scratches on marble be repaired?
Not all scratches are the same, and the repair method depends on the depth and severity. Light surface scratches that only affect the polish can usually be fixed with buffing or polishing compounds. Deeper scratches that cut into the stone may require sanding or filling with resin. In some cases, professional restoration is the most effective solution. Understanding the type of scratch helps you choose the right approach to marble scratch repair.
Do I need professional help for deep scratches?
For scratches that are deep, wide, or cover large areas, hiring a professional stone restoration expert is often recommended. They use diamond abrasives and industrial polishers that go beyond the capability of DIY tools. However, for minor blemishes, a careful DIY approach with sandpaper and polishing powder can be just as effective.
Is sealing necessary after scratch repair?
Yes, sealing is crucial after marble scratch repair. Because marble is porous, sealing protects it from absorbing moisture, oils, and stains that can worsen surface damage. Sealers also extend the longevity of your repair by adding an invisible barrier against everyday wear. For more detailed guidance, the National Park Service resource on marble care offers valuable insight into maintaining historic and modern stone.
How often should I reseal my marble?
Most experts recommend resealing every 6–12 months depending on the level of use. High-traffic areas, like kitchen counters, may require more frequent resealing. You can test if your marble needs sealing by sprinkling a few drops of water on the surface; if the water absorbs quickly instead of beading up, it’s time to reseal.
Can I prevent scratches from happening again?
While no stone surface is completely immune, prevention is possible. Always use cutting boards in the kitchen, avoid dragging heavy furniture on marble floors, and place mats under frequently used items. Regular cleaning with a pH-neutral solution and resealing will help reduce the likelihood of future scratches, making marble scratch repair less frequent in the long run.
📌 Read Similar Topics
- Fix Burn Hole on Couch
- How to Fix a Tear in Leather Shoes
- Unsticking a Zipper
- Bathtub Baking Soda Cleaning
- Acetone for Removing Super Glue
Explore these guides for more practical solutions to everyday household issues, just like you’ve learned in this marble scratch repair tutorial.
Conclusion: Putting It All Together
Marble surfaces are an investment in beauty and elegance, but they also require thoughtful care to remain in top condition. Scratches may seem inevitable over time, yet with the right knowledge, they don’t have to become permanent blemishes. Through the steps outlined in this guide—cleaning, sanding or buffing, polishing, and sealing—you now have a clear process for effective marble scratch repair. The journey may seem detailed, but every stage plays a role in ensuring a smooth and polished final result.
The introduction of proper cleaning techniques lays the groundwork for safe repairs. Sanding or buffing then addresses the visible damage, while polishing and sealing restore not only shine but also resilience. Each of these phases, when performed patiently and carefully, contributes to the overall success of the project. Even better, most scratches can be handled at home with affordable tools and supplies, saving you the expense of professional services unless the damage is extensive.
Equally important are the tips and best practices you’ve learned along the way. Avoiding acidic cleaners, resisting the urge to apply too much pressure, and remembering to seal after every repair will help you prevent damage while maintaining a long-lasting finish. Understanding alternative methods and exploring expert insights equips you with flexibility, so you can adapt your marble scratch repair approach depending on the type of scratch or surface you’re dealing with.
Ultimately, marble maintenance is about balance—repairing when necessary and preventing scratches whenever possible. Regular cleaning, sealing, and mindful use of your marble countertops, floors, or decorative pieces will keep them looking timeless. And when scratches do appear, you now have the confidence and skills to handle them effectively. By practicing these methods, you not only restore the current beauty of your marble but also ensure its elegance lasts for years to come. With patience, the right materials, and careful attention to detail, marble scratch repair can be a simple and rewarding task.


Pingback: How To Remove A Screw Without A Screwdriver Smartly And Easily