
Introduction: Why Fixing Moen Shower Valve Matters
A smoothly functioning shower valve is essential for controlling both water temperature and flow, making it one of the most important fixtures in any bathroom. When it malfunctions, you may face leaks, inconsistent water pressure, or frustrating temperature swings that can turn a relaxing shower into an unpleasant experience. Learning how to fix Moen shower valve problems ensures you not only restore convenience but also prevent wasted water and higher utility bills. Small issues left unattended can quickly escalate, causing damage to walls, tiles, or even your home’s plumbing system.
Moen is one of the most trusted names in bathroom fixtures, known for their reliability and cartridge-based valve systems. While durable, these valves are not immune to wear and tear. O-rings may deteriorate, seals can fail, and cartridges often become clogged with mineral deposits. Fortunately, most issues are easy to address with the right tools and replacement parts. Knowing how to fix Moen shower valve yourself can save you the cost of hiring a plumber and extend the lifespan of your existing setup.
In this guide, you’ll discover the tools and materials you need, step-by-step instructions to safely complete the repair, and expert tips for ensuring long-lasting results. Whether you’re dealing with a dripping handle, stuck cartridge, or fluctuating water temperature, the process to fix Moen shower valve is straightforward once you understand the basics. By the end, you’ll feel confident tackling the repair and restoring your shower to full functionality.
What You’ll Need Before You Start
Before attempting to fix Moen shower valve issues, preparation is key. Having the right tools, parts, and safety measures in place ensures the repair goes smoothly and minimizes the risk of causing further damage. Many homeowners make the mistake of diving into the repair without gathering the essentials first, only to find themselves halfway through the project missing an important part. By preparing ahead of time, you’ll save time, avoid frustration, and keep your costs under control.
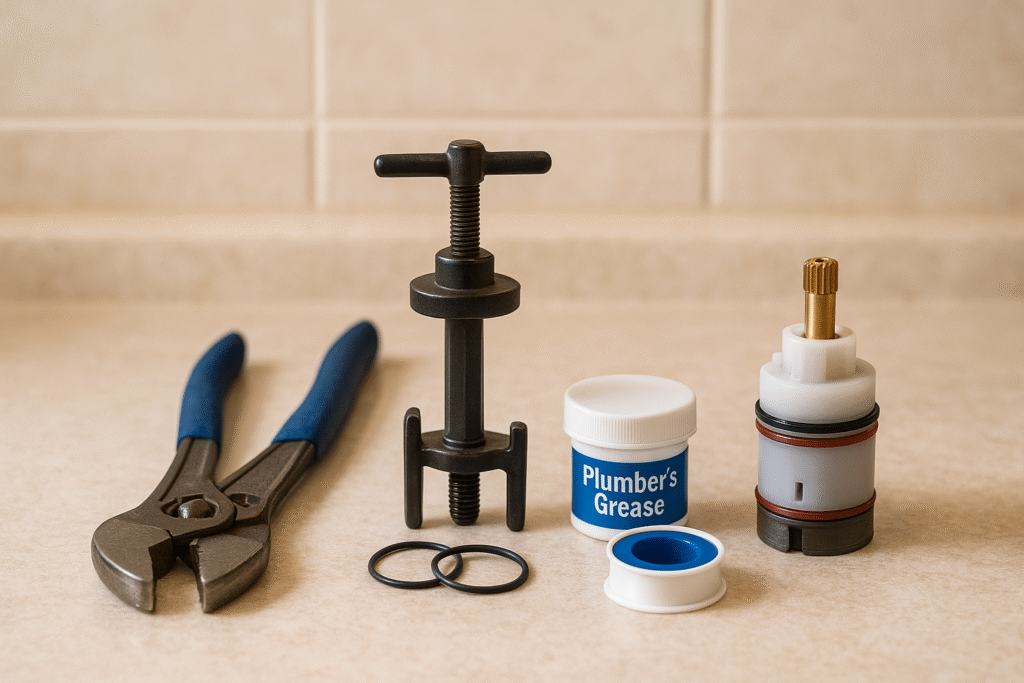
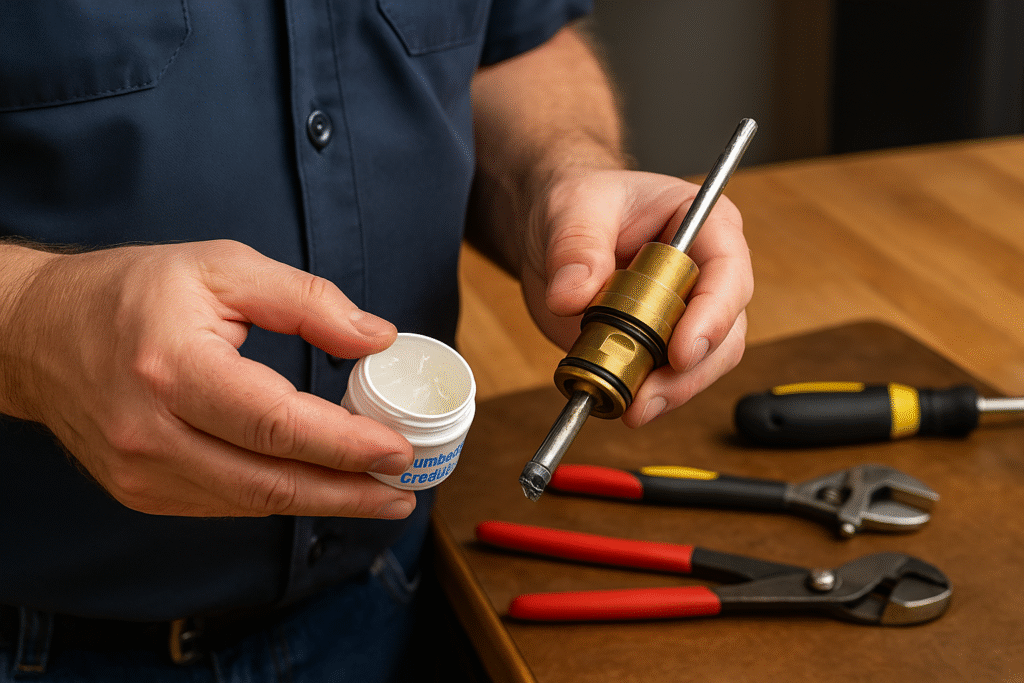
The most critical component you’ll need is a replacement Moen cartridge. Moen uses a cartridge-based system, and the model number of your shower valve determines the correct cartridge type. These cartridges are widely available at hardware stores and online, often costing between $20 and $50. To identify the right part, check your valve’s manual, look for markings, or consult Moen’s website. Along with the cartridge, it’s wise to have O-rings and rubber seals on hand, as these parts often degrade and may need replacement during the process.
For tools, you’ll need an adjustable wrench, channel-lock pliers, a Phillips and flathead screwdriver, a cartridge puller (specifically designed for Moen cartridges), plumber’s grease, and Teflon tape. A utility knife can be helpful for removing old seals, while a clean cloth will assist with wiping away residue inside the valve body. To prevent water spills, keep a small bucket or towel handy. Safety equipment such as gloves and protective eyewear is also recommended, especially when handling old, corroded parts.
Before starting, shut off the water supply to the shower and open the valve to relieve pressure. This step is non-negotiable and critical for a safe repair. Having these materials ready before you fix Moen shower valve ensures that the process is efficient and minimizes downtime for your shower.
Step 1: Shut Off Water and Access the Valve
The very first step to fix Moen shower valve problems is ensuring safety by cutting off the water supply. Skipping this step is one of the most common mistakes DIY homeowners make, and it can result in water flooding the bathroom the moment you loosen a screw. Always locate the main shut-off valve in your home or, if available, a localized shut-off for the bathroom. Turn the valve clockwise until the water stops completely. Then, open the shower handle to release any remaining pressure in the pipes—this prevents a sudden spray when you begin dismantling the valve.
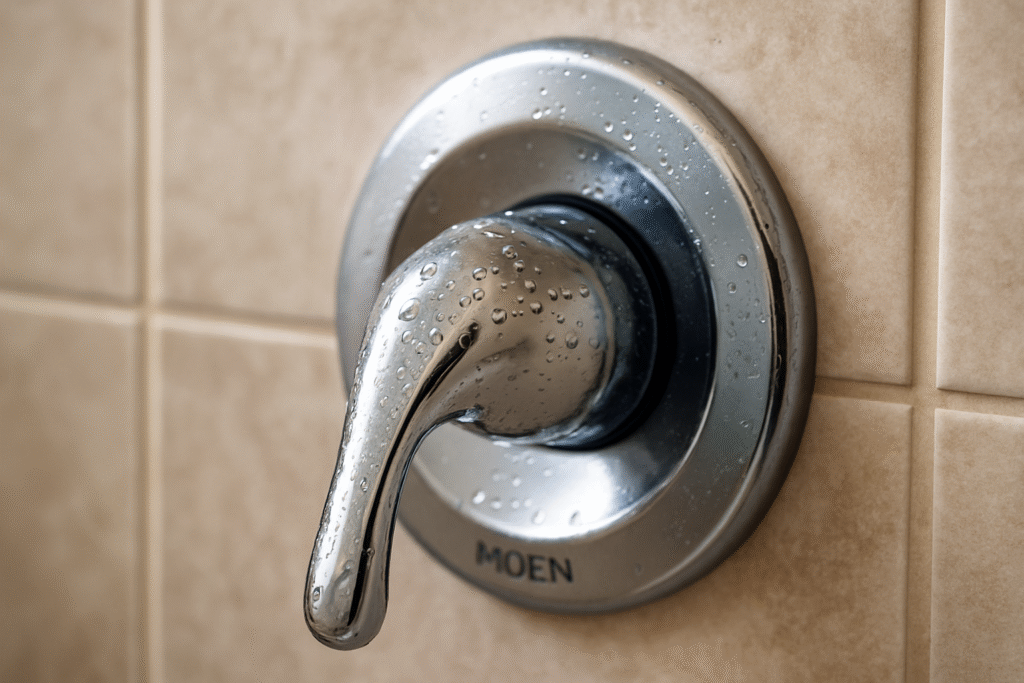
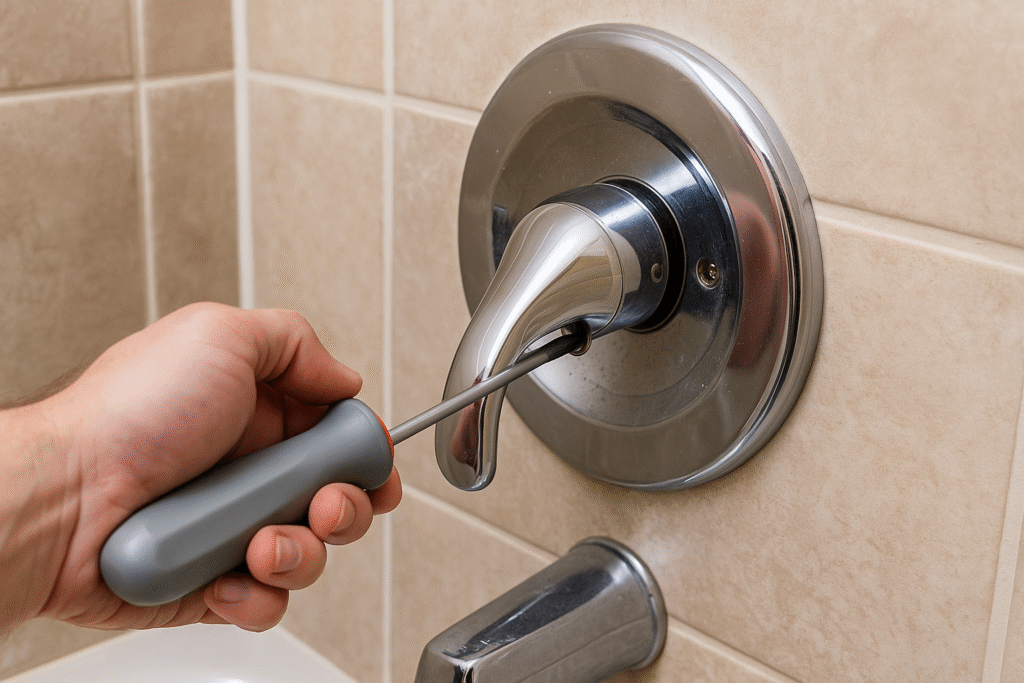
Once the water is off, focus on accessing the Moen shower valve. Start by removing the decorative cap on the shower handle using a flathead screwdriver. This reveals the screw securing the handle to the valve stem. Unscrew it carefully and pull the handle straight out; sometimes mineral deposits or corrosion make this difficult, so applying gentle rocking motions may help. Next, remove the escutcheon plate (the trim plate around the valve) by unscrewing the mounting screws. Place all screws and parts in a safe container so nothing is lost during the process.
With the handle and trim removed, you’ll see the valve body exposed in the wall. Depending on your bathroom’s design, there may also be a sleeve or retaining clip that holds the cartridge in place. At this stage, inspect the surrounding area for any water stains or mold, as these could indicate a leak that has gone unnoticed. Taking note of these details now will help you decide whether further repairs are necessary in addition to your plan to fix Moen shower valve.
By shutting off the water properly and carefully dismantling the trim and handle, you create a safe workspace for the repair. This step sets the foundation for the next stages, where you’ll remove the cartridge and begin the actual repair process.
Step 2: Remove the Cartridge
Once you’ve accessed the valve, the next step to fix Moen shower valve issues is removing the old cartridge. This component is the most common source of leaks, stiffness, or inconsistent temperature control. Over time, mineral buildup or worn seals cause the cartridge to malfunction, making replacement the most effective solution. By removing the cartridge correctly, you avoid damaging the valve body and ensure that your new cartridge fits securely.
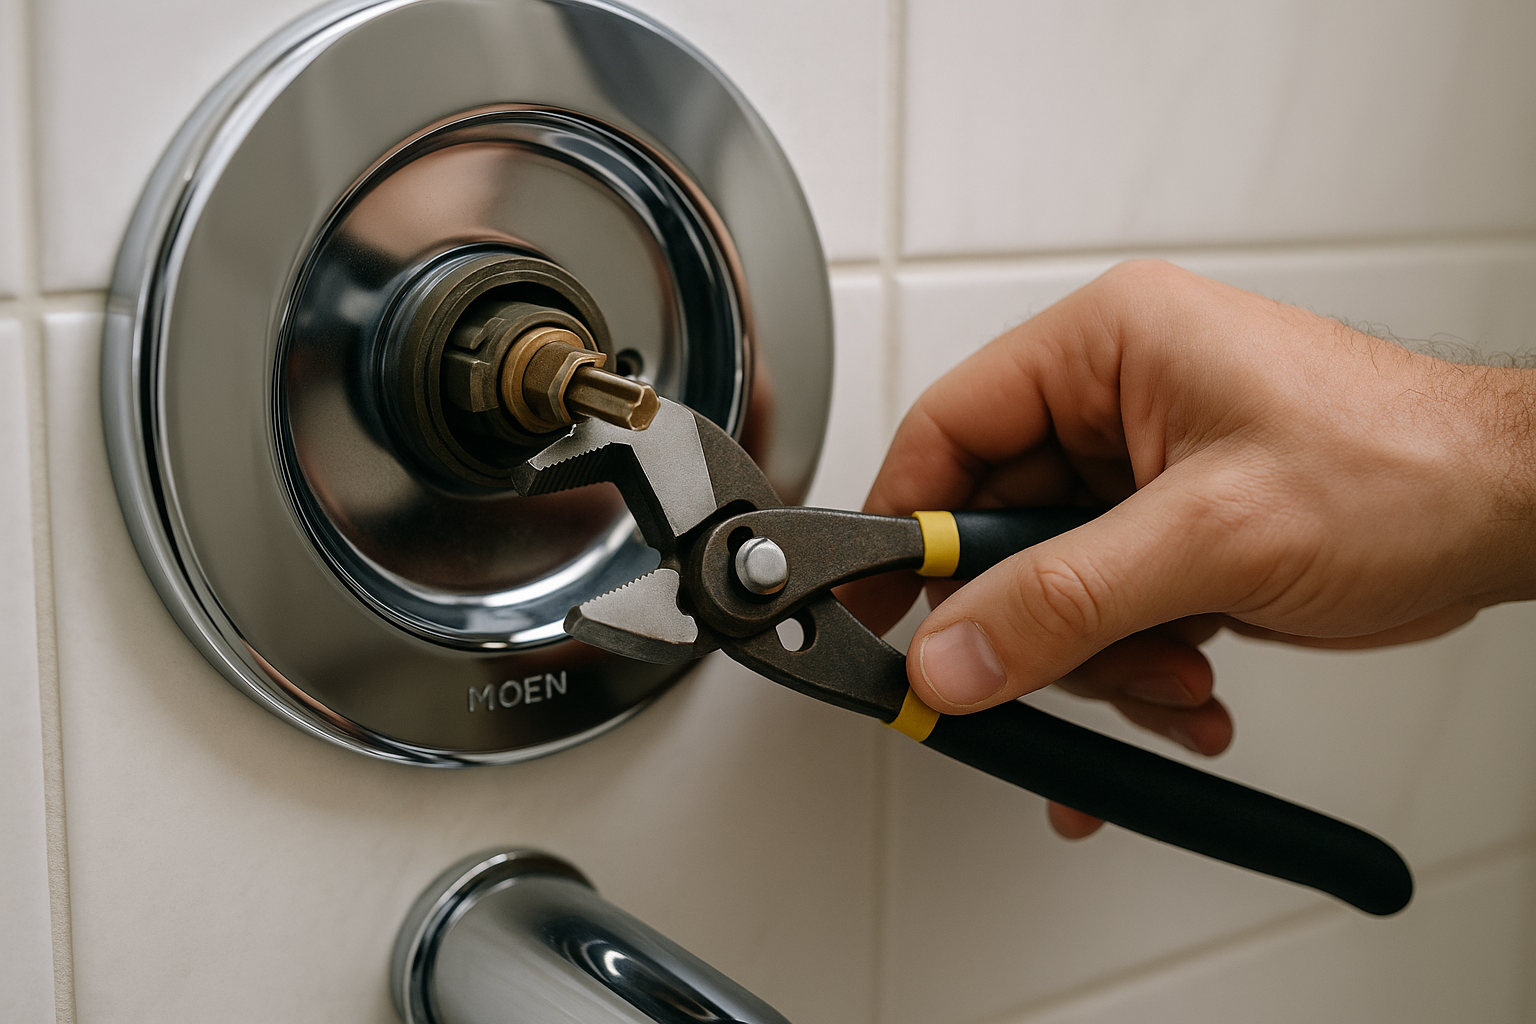
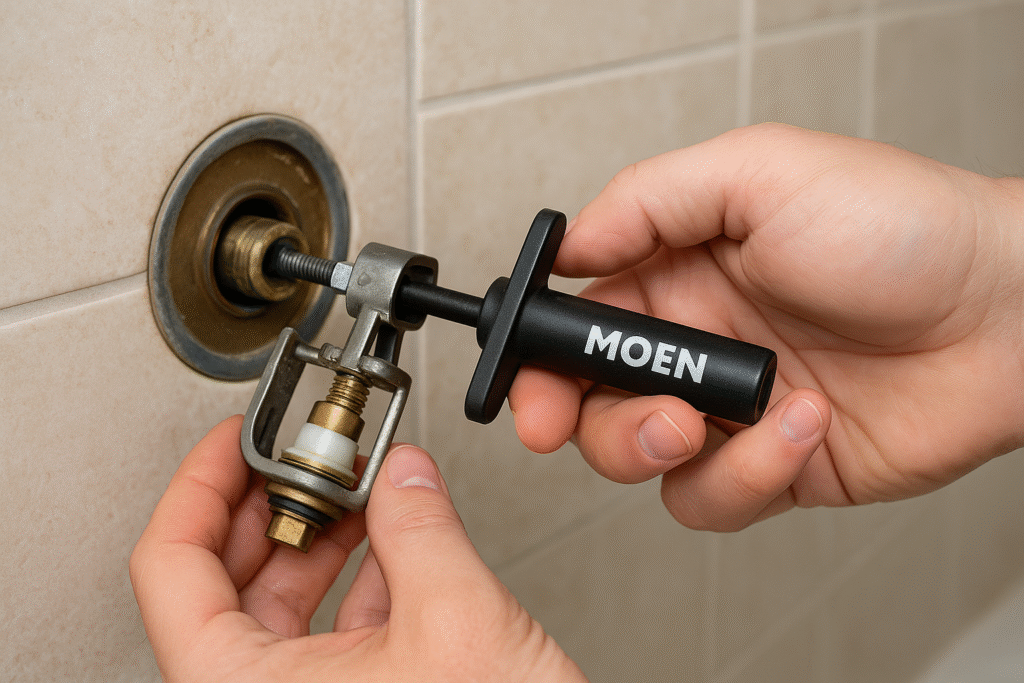
Start by identifying whether your Moen shower valve has a retaining clip. Many models use a U-shaped clip to secure the cartridge in place. Use needle-nose pliers to carefully pull the clip out without bending it. If your model doesn’t have a clip, check for a retaining nut that can be unscrewed with pliers or an adjustable wrench. Once the retaining mechanism is removed, you’ll be ready to extract the cartridge.
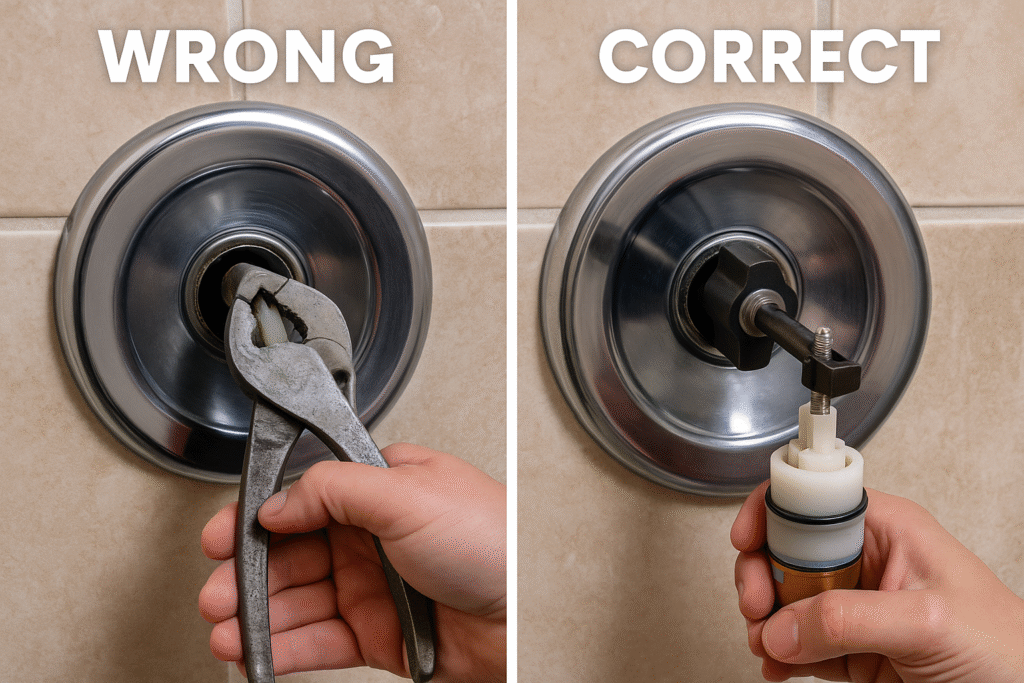
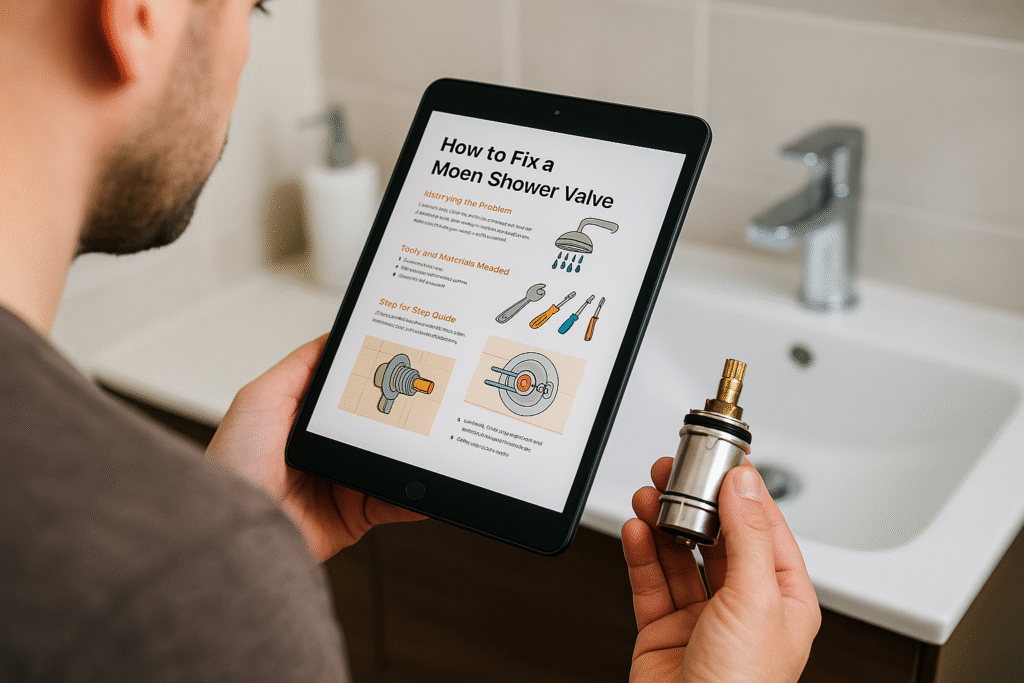
This is where a cartridge puller comes in handy. Insert the puller into the cartridge and twist gently while pulling outward. Cartridges that have been in place for years may be stubborn due to mineral deposits, so apply steady pressure rather than forcing it. Avoid prying with screwdrivers, as this can scratch the valve body and lead to leaks. After removing the cartridge, inspect it for wear and compare it to the new replacement part to confirm you have the correct model for your repair.
With the old cartridge out, clean the inside of the valve body using a soft cloth to remove debris or buildup. Applying a thin layer of plumber’s grease at this stage will make installing the new cartridge smoother. This careful removal process ensures you can fix Moen shower valve problems effectively without damaging your plumbing.
Step 3: Install the New Cartridge and Reassemble
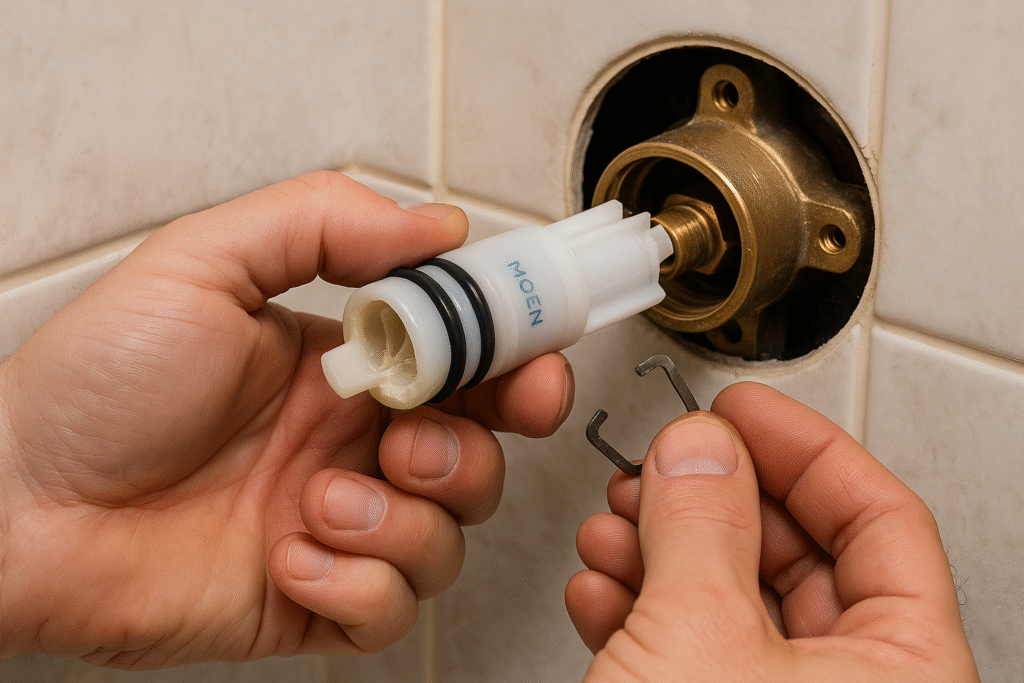
With the old cartridge removed, you’re now ready to complete the repair and fix Moen shower valve issues by installing the new cartridge. This step is critical because proper alignment ensures smooth operation of the valve and prevents future leaks. Begin by applying a thin layer of plumber’s grease to the rubber seals on the new cartridge. This reduces friction during installation and extends the life of the seals by keeping them supple.
Next, carefully align the new cartridge with the slots inside the valve body. Moen cartridges are designed to fit in a specific orientation—if inserted incorrectly, the handle may not function properly or the hot and cold water controls could be reversed. Slide the cartridge straight into the valve body with gentle pressure until it seats firmly in place. If your model uses a retaining clip, reinsert it securely with pliers. For models with a retaining nut, tighten it with an adjustable wrench until snug, but avoid overtightening, which can damage the valve body.
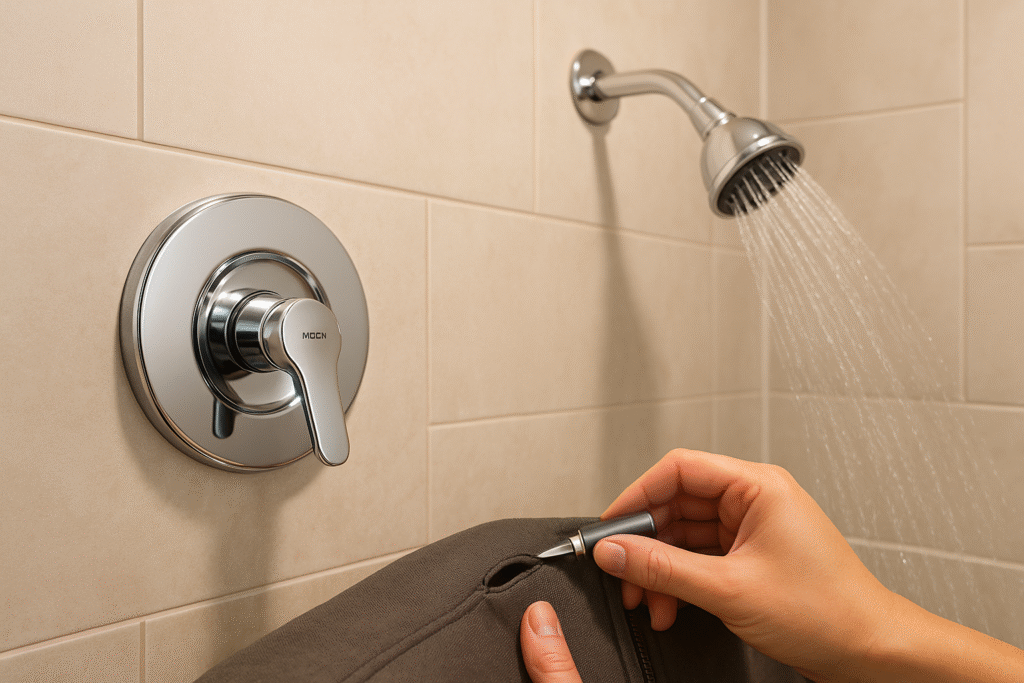
Once the cartridge is secured, reinstall the escutcheon plate and handle in reverse order of removal. Tighten all screws carefully and ensure the handle moves smoothly without resistance. Turn the main water supply back on slowly to avoid sudden pressure surges. Open the shower valve to check for proper flow and temperature control. If everything works correctly and no leaks are present, you’ve successfully managed to fix Moen shower valve problems without the need for professional assistance.
Finally, clean up your workspace and store your tools for future use. With proper installation and regular maintenance, your Moen shower valve should operate reliably for many years, making this repair both cost-effective and rewarding.
Common Mistakes to Avoid When You Fix Moen Shower Valve
While the process to fix Moen shower valve problems is straightforward, there are several pitfalls that can complicate the repair or even damage the valve assembly. One of the most common mistakes is failing to shut off the water supply before starting. Even a small amount of water pressure left in the system can cause flooding or injury when the valve is opened. Always confirm that the water is completely off by testing the shower handle before removing any parts.
Another frequent error involves skipping the use of a cartridge puller. Many homeowners attempt to pry out the cartridge with pliers or screwdrivers, which often damages the valve body. This can lead to leaks that require costly professional intervention. Investing in the proper cartridge removal tool saves time, protects the valve, and ensures the replacement process goes smoothly. Equally important is checking the orientation of the new cartridge; installing it backward may result in reversed hot and cold water flow, forcing you to redo the repair.
Overtightening screws and nuts during reassembly is also a problem. Excessive force can crack trim plates or strip screws, leaving the valve loose and unstable. It’s better to tighten parts firmly but carefully, ensuring a snug fit without over-stressing the components. Additionally, neglecting to use plumber’s grease on O-rings and seals can shorten the lifespan of the new cartridge, as friction and mineral deposits will wear them down faster.
Lastly, forgetting to flush the valve body before inserting the new cartridge can cause debris to remain inside, leading to leaks or stiffness soon after installation. Taking a few minutes to clean and lubricate ensures that when you fix Moen shower valve, the repair lasts longer and the operation feels smooth.
Alternative Methods for Fix Moen Shower Valve
While replacing the cartridge is the most common way to fix Moen shower valve problems, there are alternative methods worth considering depending on the specific issue. Not every malfunction requires a full cartridge replacement, and exploring other solutions can sometimes save time and money. For example, if your valve is leaking slightly, the problem may stem from worn O-rings or seals rather than the entire cartridge. In such cases, replacing the seals alone is sufficient to restore proper functionality.
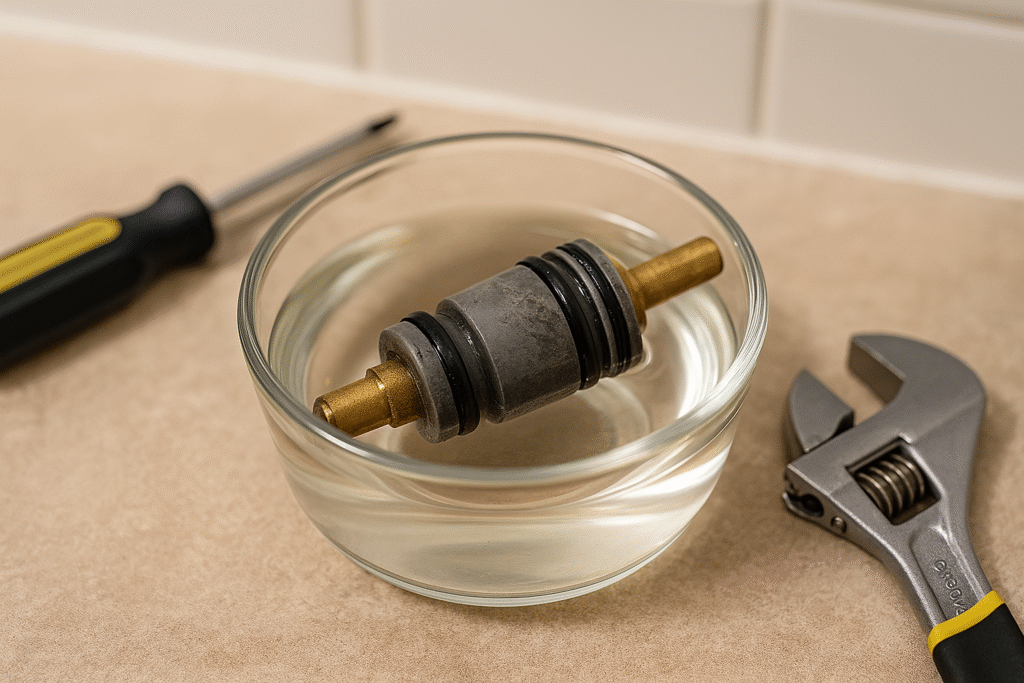
Another alternative involves cleaning mineral deposits inside the valve. Hard water buildup is a common culprit behind stiff handles and inconsistent water flow. To clean the valve, remove the cartridge and soak it in a vinegar solution for several hours. This process dissolves mineral deposits and may restore smooth operation without purchasing a new cartridge. After cleaning, applying plumber’s grease to the seals ensures the cartridge functions more effectively when reinstalled.
In situations where the valve body itself shows signs of corrosion or wear, an epoxy or sealant repair may temporarily stop leaks. While not a permanent solution, it can buy time until you are ready for a more comprehensive repair or replacement. Similarly, some homeowners opt for valve repair kits specifically designed for Moen products, which include seals, clips, and tools necessary to perform small-scale repairs.
If you’re hesitant about performing the repair yourself, hiring a plumber is always an alternative method. A professional can fix Moen shower valve issues quickly and with the right equipment, ensuring the repair lasts. This is especially recommended if your valve is an older model or if the plumbing behind the wall requires additional adjustments. Weighing these options helps you determine the most cost-effective and reliable path for your situation.
Expert Tips and Best Practices
If you want your repair to last and operate smoothly, following expert tips is essential when you fix Moen shower valve problems. Professionals recommend always using genuine Moen replacement parts rather than generic alternatives. While off-brand cartridges may seem cheaper, they often lack the precise engineering needed for a perfect fit, leading to leaks and premature wear. Genuine Moen parts ensure compatibility and maintain the long-term reliability of your shower valve.
Another best practice is to lubricate all O-rings and seals with plumber’s grease before installation. This not only makes the installation process smoother but also helps prevent leaks and extends the life of the seals. Experts also advise against overtightening screws and retaining nuts, which can cause cracks or distortions in the valve components. Instead, aim for a snug fit without forcing the parts into place.
It’s also important to flush the valve body before inserting the new cartridge. Running water through the open valve body for a few seconds clears out debris and mineral deposits that could compromise the new part. Additionally, mark the orientation of the old cartridge before removal to ensure the new one is installed correctly. This prevents the common mistake of reversed hot and cold water flow, which can be frustrating to correct later.
For more in-depth technical guidance, you can consult Moen’s official support resources, which include diagrams, troubleshooting guides, and repair videos available on the Moen Customer Support page. Plumbing associations such as the Plumbing Foundation also offer excellent resources for safe practices. By following these expert recommendations, your effort to fix Moen shower valve will result in a reliable and long-lasting repair.
Frequently Asked Questions About Fix Moen Shower Valve
When learning to fix Moen shower valve issues, it’s common for homeowners to have questions about cost, difficulty, and long-term reliability. Below are answers to the most frequently asked questions that can help you make informed decisions during the repair process.
How do I know if my Moen shower valve needs fixing?
Signs include dripping water when the shower is off, difficulty turning the handle, irregular water temperature, or low water pressure. These symptoms usually point to a worn cartridge or deteriorated seals that need attention.
Do I need special tools to fix Moen shower valve problems?
Yes, while basic tools like wrenches and screwdrivers are essential, a cartridge puller designed for Moen valves is highly recommended. This tool makes removing stubborn cartridges easier and safer, preventing damage to the valve body.
How much does it cost to repair versus replace?
Repairing typically costs between $20 and $50 for a new cartridge, plus the cost of tools if you don’t already own them. Hiring a plumber can raise the cost to $150–$300. Replacing the entire valve assembly, however, is significantly more expensive and usually unnecessary unless the valve body itself is damaged.
Can I perform the repair myself, or should I hire a plumber?
Many homeowners successfully fix Moen shower valve issues on their own, especially cartridge replacements. However, if the valve is old, corroded, or requires soldering or wall access, hiring a plumber is the safer option. For detailed DIY guidance, you can also review the Family Handyman shower valve repair guide.
How long does a new cartridge last?
With proper installation and regular maintenance, a new Moen cartridge can last 10 to 15 years. Hard water may shorten this lifespan, so using water softeners or cleaning the valve periodically can extend its durability.
By understanding these common questions, you’ll feel more confident tackling the repair and keeping your Moen shower valve in top condition.
📌 Read Similar Topics
- The Ultimate Guide to Fix Burn Hole on Couch
- How to Fix a Tear in Leather Shoes
- Unsticking a Zipper: Simple DIY Fixes
- Dishwasher Replacement Cost Explained
- Remove Superglue from Painted Material
Conclusion: Putting It All Together
Learning how to fix Moen shower valve issues equips homeowners with the knowledge to save money, prevent water damage, and restore comfort in their bathrooms. From shutting off the water and safely removing the handle to replacing the cartridge and avoiding common mistakes, each step builds toward a successful repair. While Moen valves are durable, regular maintenance and occasional part replacements ensure they continue to perform reliably for years.
The process may seem intimidating at first, but with the right tools and preparation, even a beginner can carry out the repair effectively. By using genuine Moen replacement parts, applying plumber’s grease, and carefully reassembling the valve, you greatly reduce the chances of leaks or future problems. For homeowners who prefer professional help, plumbers can complete the task quickly, but understanding the process gives you confidence in evaluating their work and costs.
Beyond the immediate repair, following best practices such as cleaning mineral buildup and monitoring your valve’s performance extends its lifespan significantly. Resources from Moen and trusted plumbing guides also provide valuable support, ensuring you always have expert advice at your fingertips. Whether you choose a DIY approach or hire a professional, knowing how to fix Moen shower valve problems empowers you to keep your bathroom functioning at its best.
In the end, this repair is not only cost-effective but also highly rewarding. Taking the time to fix your Moen shower valve restores smooth water control, prevents waste, and helps maintain the comfort of your home. With a little patience and preparation, you can confidently handle one of the most common bathroom repairs.


Pingback: How To Clean Thermocouple For Fast Reliable Performance
Pingback: Door Latch Not Fully Retracting? Quick Powerful Fixes
Pingback: Repressuring A Boiler With Safe Powerful DIY Steps
Pingback: How To Stop Faux Leather From Peeling With Smart Fixes