Dealing with a broken plastic threaded elbow stuck in the threads can be a frustrating challenge, especially when you’re trying to repair plumbing or other essential systems. Knowing how to remove broken plastic threaded elbow from threads is a crucial skill to save time, avoid further damage, and restore functionality quickly. Whether you’re a DIY enthusiast or a homeowner facing this issue for the first time, this guide will help you understand the tools, techniques, and preventive measures to handle it effectively.
A broken plastic elbow often results from over-tightening, wear and tear, or exposure to harsh elements. Removing it without damaging the threads is critical for a successful repair. With the right approach and patience, you can safely extract the broken piece and get your system back to working condition. This comprehensive guide covers everything from identifying the problem to advanced removal techniques.
Understanding the Issue Of Broken Plastic Threaded Elbow
The first step to successfully remove broken plastic threaded elbow from threads is identifying the underlying problem. A broken plastic elbow might leave fragments lodged in the threads, making it impossible to unscrew the fitting easily. This can lead to:
- Restricted water or fluid flow.
- Potential leaks around the damaged threads.
- Damage to the threads if improper tools or methods are used.
Recognizing these signs helps you prepare for an effective and damage-free solution.
Tools and Materials Needed
Gathering the right tools beforehand will simplify the removal process. Here’s a list of essentials:
- Needle-nose pliers.
- Adjustable wrench.
- Heat gun or hairdryer.
- Screw extractor or reverse-threaded screw.
- Hacksaw blade or keyhole saw.
- Lubricant (like WD-40).
- Teflon tape or plumber’s tape.
- Safety goggles and gloves.
Each tool plays a specific role in ensuring safe and efficient removal of the broken plastic threaded elbow.
Preparing the Workspace
Preparation is key to achieving success when you remove broken plastic threaded elbow from threads. Follow these steps:
- Turn off the water supply or disconnect the affected pipe.
- Clean the area around the broken elbow to ensure no debris interferes with removal.
- Wear safety goggles and gloves to protect yourself during the process.
Creating a clean and safe workspace reduces the chances of accidental damage and injuries.
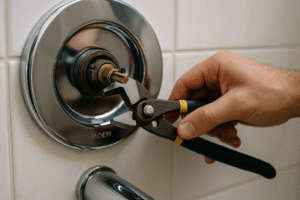
Using Pliers for Simple Removal
If a portion of the broken plastic elbow is still visible, start with pliers:
- Grip the visible part firmly with needle-nose pliers.
- Apply steady, gentle pressure to twist it counterclockwise.
- If the plastic resists, use a lubricant like WD-40 to loosen it.
This method works best when the broken piece is only slightly lodged.
Applying Heat for Expansion
When the plastic is stuck tightly, applying heat can loosen it:
- Use a heat gun or hairdryer to warm the surrounding threads gently.
- Avoid overheating to prevent damage to plastic or metal parts.
- Once heated, attempt removal with pliers or a wrench.
Heat helps expand the plastic, making it easier to extract.
Sawing and Extracting
For stubborn cases, sawing may be necessary:
- Use a hacksaw blade to cut notches into the plastic elbow.
- Insert a screwdriver into the notches to turn and remove the broken piece.
- Alternatively, use a screw extractor for precision removal.
This method requires patience but is highly effective for deeply lodged pieces.
Advanced Techniques
If basic methods fail, try these advanced approaches:
- Reverse-Threaded Screws: These screws grip the broken plastic and twist it out as you tighten them.
- Dremel Tool: Use this tool to carefully grind away stubborn fragments without damaging the threads.
These methods should only be used if simpler techniques do not work.
Preventing Damage to Threads
While removing the broken plastic elbow, it’s essential to protect the threads:
- Avoid using excessive force or sharp tools that can strip the threads.
- Clean the threads with a soft brush after removal to ensure no debris remains.
- Apply plumber’s tape before reassembly to create a watertight seal.
Taking these precautions ensures a smooth reinstallation process.
Replacing the Elbow
After removing the broken piece, it’s time to install a new elbow:
- Wrap plumber’s tape around the threads of the new elbow.
- Screw it in place, ensuring a snug but not overly tight fit.
- Test the system for leaks after reassembly.
Proper installation prevents future issues with broken elbows.
Preventive Measures
To avoid facing a similar issue in the future:
- Use high-quality plastic elbows that can withstand wear and tear.
- Avoid over-tightening during installation.
- Regularly inspect fittings for signs of wear or damage.
Preventive care saves time and effort in the long run.
Conclusion: How to Remove Broken Plastic Threaded Elbow from Threads
Knowing how to remove broken plastic threaded elbow from threads is a valuable skill for any homeowner or DIY enthusiast. By following these steps and using the right tools, you can safely and efficiently resolve this common plumbing issue.
Remember to approach the task with patience, prioritize safety, and avoid shortcuts that can damage the threads. With practice and proper maintenance, you can handle similar challenges with confidence and ease.
Share this:
- Click to share on Facebook (Opens in new window) Facebook
- Click to share on X (Opens in new window) X
- Click to share on LinkedIn (Opens in new window) LinkedIn
- Click to share on Reddit (Opens in new window) Reddit
- Click to share on X (Opens in new window) X
- Click to share on Threads (Opens in new window) Threads
- Click to share on WhatsApp (Opens in new window) WhatsApp