Have you ever faced the challenge of trying to remove plastic pegs from keyboard? These small, often stubborn components can make cleaning, repairing, or replacing keyboard keys a daunting task. Whether you’re an avid gamer dealing with sticky keys or a professional needing a smooth typing experience, understanding how to safely and effectively remove plastic pegs can save time, money, and frustration.
This guide dives deep into everything you need to know about how to remove plastic pegs from keyboard. From identifying the purpose of these pegs to providing step-by-step removal techniques, we’ll cover every detail to make the process simple and efficient. Plus, you’ll learn the best tools, common mistakes to avoid, and preventive maintenance tips to keep your keyboard in top condition. By the end, you’ll be a pro at handling keyboard plastic pegs with confidence.
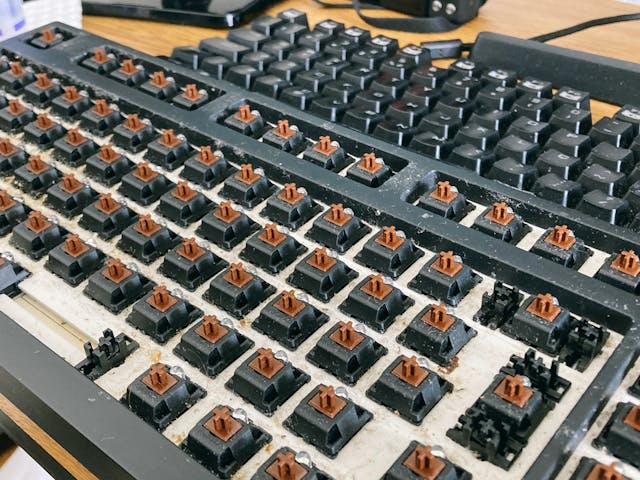
1. What Are Plastic Pegs on a Keyboard?
Understanding the Role of Plastic Pegs
Plastic pegs are tiny components found under the keys of many keyboards. Their main functions include:
- Stabilizing Keys: Larger keys, such as the spacebar or Enter key, often have plastic pegs to keep them steady.
- Connecting Keycaps: Pegs link keycaps to the switches underneath, ensuring smooth typing action.
- Protecting the Switch Mechanism: They act as a buffer, preventing direct contact between the keycap and switch, which can prolong the keyboard’s lifespan.
Types of Plastic Pegs
- Snap-On Pegs: These are designed for easy attachment but may require careful handling to remove.
- Push-In Pegs: Often more secure, these may need specific tools to dislodge without damage.
- Integrated Pegs: Found in compact keyboards, these pegs are part of the keycap structure and can be tricky to replace.
Understanding the type of peg on your keyboard is the first step to effectively removing plastic pegs from keyboard.
2. Tools You Need to Remove Plastic Pegs from a Keyboard
Basic Tools for Removal
- Keycap Puller: Essential for safely removing keycaps without damaging the pegs.
- Plastic Pry Tools: Designed to gently dislodge pegs without scratching surfaces.
- Tweezers: For gripping and maneuvering small parts.
- Compressed Air: Helps clear debris around the pegs for smoother removal.
Advanced Tools for Stubborn Pegs
- Precision Screwdrivers: Ideal for loosening tightly attached pegs.
- Heat Gun: For softening rigid plastic pegs, making removal easier.
- Mini Pliers: Provide extra grip for pegs that are firmly stuck.
Investing in the right tools ensures a hassle-free process to remove plastic pegs from keyboard while minimizing the risk of damage.
3. Step-by-Step Guide to Removing Plastic Pegs
Preparation
- Step 1: Turn off and unplug your keyboard.
- Step 2: Place the keyboard on a flat, clean surface.
- Step 3: Take a picture of the keyboard layout for reference.
Removal Process
- Remove the Keycap: Use a keycap puller to gently lift the keycap without bending the peg.
- Inspect the Peg: Check for any visible damage or tight spots.
- Loosen the Peg: Use a plastic pry tool or tweezers to gently wiggle the peg free.
- Apply Controlled Force: If the peg resists, apply slight pressure with a mini plier or heat it lightly for flexibility.
Post-Removal
- Store the pegs safely if they need reattachment later.
- Inspect the keyboard switch for dust or debris, cleaning it if necessary.
This method ensures you safely remove plastic pegs from keyboard without causing unnecessary harm.
4. Common Challenges and Solutions
1. Pegs Breaking During Removal
- Cause: Excessive force or using the wrong tools.
- Solution: Always use a gentle twisting motion and the correct tools.
2. Stubborn Pegs
- Cause: Dirt or adhesive buildup.
- Solution: Clean around the peg with compressed air or apply a small amount of isopropyl alcohol.
3. Losing Pegs
- Cause: Mishandling or improper storage.
- Solution: Use a magnetic tray or a small container to store removed pegs.
Tackling these challenges ensures a smooth process every time you remove plastic pegs from keyboard.
5. Maintaining Your Keyboard After Removing Pegs
Regular Cleaning Tips
- Use compressed air weekly to remove dust.
- Wipe the keyboard surface with a microfiber cloth and mild cleaning solution.
Proper Storage
Store removed pegs and keycaps in labeled containers if you plan to reattach them later.
Preventive Care
Invest in a keyboard cover to minimize dirt buildup, reducing the frequency of needing to remove plastic pegs from keyboard.
6. How to Reattach Plastic Pegs Correctly
Steps for Reattachment
- Align the peg with its original socket or groove.
- Press gently but firmly until it clicks into place.
- Reattach the keycap by pressing it down evenly.
Testing the Keyboard
Once all pegs are reattached, test the keys to ensure they function smoothly.
Proper reattachment is crucial after you remove plastic pegs from keyboard, especially if you plan to use the same keys again.
7. When to Replace Plastic Pegs
Signs You Need New Pegs
- Visible cracks or damage.
- Keys wobble despite reattachment.
- Pegs no longer fit snugly into their sockets.
Finding Replacement Pegs
- Check with your keyboard manufacturer.
- Look for compatible parts on online marketplaces.
Replacing worn pegs is an important step if you frequently remove plastic pegs from keyboard.
8. Customizing Your Keyboard After Peg Removal
Keycap Upgrades
After removing the pegs, consider upgrading to custom keycaps for a fresh look and feel.
Switch Lubrication
Take the opportunity to lubricate keyboard switches for smoother typing action.
RGB Enhancements
If your keyboard supports it, enhance its aesthetics by installing RGB lighting.
Customizing your keyboard is a fun and practical option after you remove plastic pegs from keyboard.
9. Common Mistakes to Avoid
1. Skipping Proper Tools
Using household items can damage your keyboard during peg removal.
2. Applying Too Much Force
Gentle, controlled movements are key to preventing breakage.
3. Ignoring Manufacturer Instructions
Always refer to the keyboard’s manual for specific guidelines.
Avoiding these mistakes ensures you can confidently remove plastic pegs from keyboard.
10. Expert Tips for Advanced Users
Removing Pegs from Mechanical Keyboards
- Use specialized tools for mechanical keyboard components.
- Lubricate pegs before removal to reduce friction.
Handling Older Keyboards
Older keyboards may have brittle plastic pegs. Apply extra caution and patience during removal.
With these expert tips, even seasoned users can efficiently remove plastic pegs from keyboard.
Conclusion
Mastering the art of removing plastic pegs from keyboard not only simplifies maintenance but also opens up opportunities for customization and repairs. From understanding the role of plastic pegs to overcoming common challenges, this guide has equipped you with the knowledge and tools needed for success. Whether you’re a casual user or an advanced enthusiast, these tips ensure a safe and effective process every time.
By investing time in proper techniques and preventive care, you can extend the lifespan of your keyboard and enjoy a seamless typing experience. So the next time you need to remove plastic pegs from keyboard, you’ll do so with confidence and precision.